This document has some parts which are outdated due to system enhancements and feature upgrades, specifically around radio Auto-RF settings. Please see the updated version here:
This document is an update to a previous post on the community, “cnPilot Recommended Base Configuration”. It provides a base set of configurations for cnPilot, XV, and XE access points which will be used in normal situations. This is only a recommendation from which to start and is not intended to fulfill the needs of every situation.
Configuration Methods
It is possible to configure Cambium Enterprise APs through three different methods: cnMaestro, the AP GUI, or the AP CLI. Of the three, the highly recommended method is via cnMaestro. This document will cover configuring APs via the cnMaestro X Cloud management system. Configuration steps and options will be very similar in cnMaestro Essentials Cloud and On-Premises and cnMaestro X On-Premises. Other documents will be available on configuring AP through their GUI.
Configuring through cnMaestro X Cloud
Expand the Menu
Looking at the left-hand side of the screen when you first log into cnMaestro X you will see a menu with a blue background. Until you are familiar with the menu options in blue on the left, it can be more convenient to click on the symbol of a right arrow at the top to expand this menu to include the titles of each icon.

Now you can read the labels for each menu option and even see which ones can be expanded farther. Once you are familiar with these options, click the left arrow to shrink down the menu to allow more screen space for the information associated with each menu option.
Settings
If you are following along with your own cnMaestro account, you may notice that the menu options I am showing here do not follow exactly with your own. This is because cnMaestro allows you to select an Account View based on the type of Cambium products you will be managing. Some account views are for our Fixed Wireless products only, some are for the Enterprise products only, and some views combine Fixed Wireless and Enterprise products. Even if your view is a little different, you can still do everything that I will cover here, but you may need to navigate slightly differently from time to time.

Configuration
In this document, I will only cover what is needed in most cases to get a basic network up and running.
When using cnMaestro X for the first time it can be confusing as to the order in which to configure each component of the overall configuration, be it the WLANs, the AP Groups, or even onboarding APs.
The most intuitive route would seem to be to start at the top of the menu and work your way down. This works great after you have the network devices configured and deployed and are now monitoring and managing the network. However, for the initial configuration it is easier to start at the bottom and working your way up.
Near the bottom of the menu is Administration. From this menu selection, you can add new users, review the status of Jobs (such as configuration updates, software updates, reports and actions), change cnMaestro settings, and enforce configuration synchronization.

On the Settings à Software Images page, I suggest enabling the automatic update of device software when a device is first onboarded.

Network Services
The Network Services menu provides options such as creating an API client allowing you to interact with cnMaestro X using RESTful APIs. You can also create custom free, paid-gateway, or voucher based Guest Access portals.
If you are going to setup a Guest WLAN, it is wise to create a Guest Portal before trying to configure a Guest WLAN. You can then assign a Guest Portal to one or more Guest WLANs.
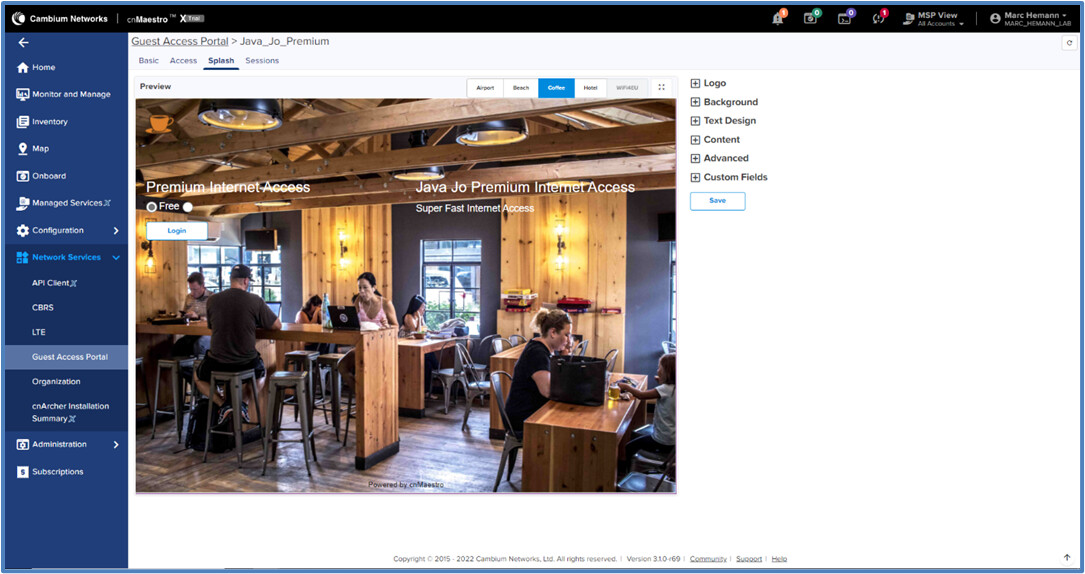
Go to the Guest Access Portal page, click Add Portal, give the new portal a name and click Save. Click on the Guest Portal Name and go to the Access page. You have the option of creating a free guest access portal, a paid-gateway access portal, or a voucher based access portal.
On the Free page, click Enable Free Access. Under Client Session, for Renewal Frequency, enter 2 hours and click Save. Under Session Duration, enter 2 hours. Click Save.
On the Splash page, you can select any of the pre-configured templates, Airport, Beach, Coffee, and Hotel. You will use these templates for your Guest Access portal splash page. Or you can customize any of these templates with your own backgrounds, messages, and the overall look and feel of the splash page. Click Save. This is a very basic portal and creating Guest Access portals is covered in deeper detail in other documents.
WLANs
Moving up the menu are Configuration options. This is where you will configure AP Groups and Switch Groups. These are configuration templates for Cambium Enterprise access points and cnMatrix switches.
At the top of the AP Groups and WLANs page, you will see two tabs, the AP Groups and WLANs tabs. Go to the WLANs page. The next step is to add the WLANs that you will be using. You can always add more later, but you will need at least one WLAN created in order to complete a base configuration. Each WLAN can be assigned to more or more AP Groups.
The WLANs page shows you an inventory of your existing WLANs and also allows you to create a new WLAN. To create a new WLAN, click the New button. On the left side of the page, you will see configuration options for a WLAN including the basic configuration settings, AAA Servers, Guest Access, Access Control, and Passpoint. For the purposes of this document, I will limit the discussion to the basic configuration and one point about Guest Access.

Basic WLAN Configuration
On the Basic page, select the Type of network this WLAN will be used in. Click the dropdown and select Enterprise Wi-Fi. Notice that some options have an asterisk next to them. This indicates that information must be entered into those fields before the WLAN can be saved. These fields include a Name, the SSID, and the VLAN.
The Name and SSID are commonly the same, although this is not strictly necessary. When you fill in the Name, the SSID will automatically fill in with the same value. This can be changed if desired. By default, the VLAN is set to 1. And by default, VLAN 1 is set to be untagged. You can only assign a VLAN to a WLAN in this menu; you cannot change the VLAN characteristics (such as whether or not it is tagged) until you move to the AP Group menu options.
Under Scope, select Base Infrastructure so that the WLAN is accessible by all accounts.
At this point, you can choose to leave the WLAN enabled or disabled. Disabling it allows you to send the configuration to your APs now, but not have the SSID broadcasted until you later decide to do so.

Other options that are typically configured here are the Security settings (Open, WPA2/WPA3 Pre-Shared key - use when there is a combination of Wi-Fi 5 & Wi-Fi 6 clients, WPA3 Pre-Shared Keys - Wi-Fi 6 clients only, WPA2-PSK, and WPA2-Enterprise).
Another option is whether or not to enforce Client Isolation. Client Isolation prevents WiFi clients from communicating with each over and is a good option if this WLAN is used for Guest access.
Configure your options and be sure to save them.
Guest Access
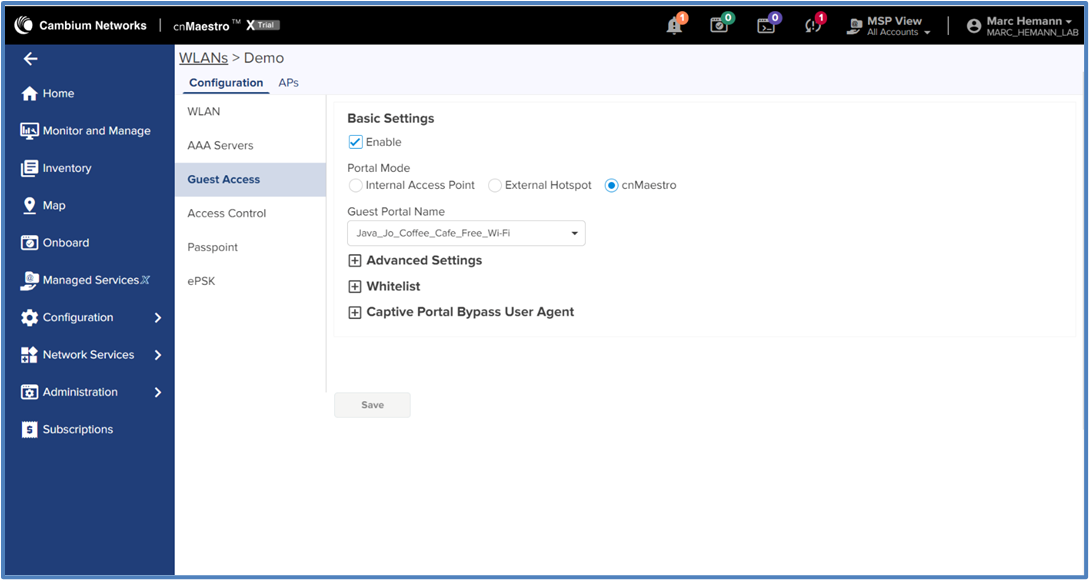
Although this document will not cover the fine details of setting up a Guest WLAN, I will cover some basics here. Select the Guest Access menu option. From here, if you choose to make this new WLAN a Guest WLAN, first Enable Guest Access at the top of the configuration options list.
Next, you will see three options for the Guest Portal.
Internal Access Point . Each AP has the ability to operate a separate Guest Portal instance. This is the least used option as it is more common for the Guest WLAN to appear on more than one AP. In this case, one of the other two options will server client much more efficiently, allowing roaming between APs.
External Hotspot . With this option, you can direct clients through an external hotspot service when connecting to this WLAN.
cnMaestro . With this option, you can utilize the Guest Portal that is created under Network Services and referenced earlier. This is the most commonly used option. When you utilize this option, you will need to fill in the name of the Guest Portal service created earlier exactly as it was named when created. This is why I suggested creating the portal before creating the WLAN.
Select cnMaestro and under Guest Portal Name, select the Guest Access portal you created in earlier steps. Save your work.
AP Groups
Next, we will create and configure an AP Group. This is where the bulk of the configuration occurs. From here you will select the WLANs to be assigned to APs and configure Management, Radio, Network, Tunneling, and other settings. We will only cover the most common used options here.
Go back to Configuration and then AP Groups and WLANs. This time we will stay on the AP Groups page. Click the New button. On the AP Group page, notice that you have options to configure Basic Information, Management information, Radio settings, Network settings, Security settings, enable Services and add CLI commands to the AP configuration.
Again, you will see a couple fields that are mandatory as indicated by an asterisk. You must have a name for your AP Group and a Country. The Country field will assign the Country Code settings to the APs. If you are deploying in a country such as the US where the regulatory agencies dictate that a country code must be locked down in the AP before it is shipped, you will need to choose the right option before cnMaesto can even affect any other configuration changes to your APs. In many countries around the world, you can actually change the country code on the AP by changing this setting in cnMaestro. In the US, Israel, and Japan that is locked down in the AP and must match what is set in cnMaestro.
Under Basic Information, for Type, select Enterprise Wi-Fi. Give the AP Group a name and under Scope, select Base Infrastructure.
Select the Country.
Depending on your country code settings, choosing Indoor or Outdoor placement will affect what EIRP limitations are adhered to as regulations can vary between indoor and outdoor deployments. In the US this is no longer the case, so this option does not affect your APs.
You must also choose as least one WLAN before you can save the AP Group. Under WLAN, click the Add WLAN link. Select the WLAN you created in earlier steps and click Add. This is why I suggested creating the WLANs before creating the AP Group.
Make your selections and be sure to Save.
Next select Management. You are required to change the default password, which is “admin”. You can also specify the methods through which management access can occur on the APs based on your organization’s security standards.
Setting the Time Zone and specifying NTP servers will give your logs more meaning. Although not a requirement, I do recommend completing this step. A popular NTP server is pool.ntp.org.
Be sure to Save your changes.
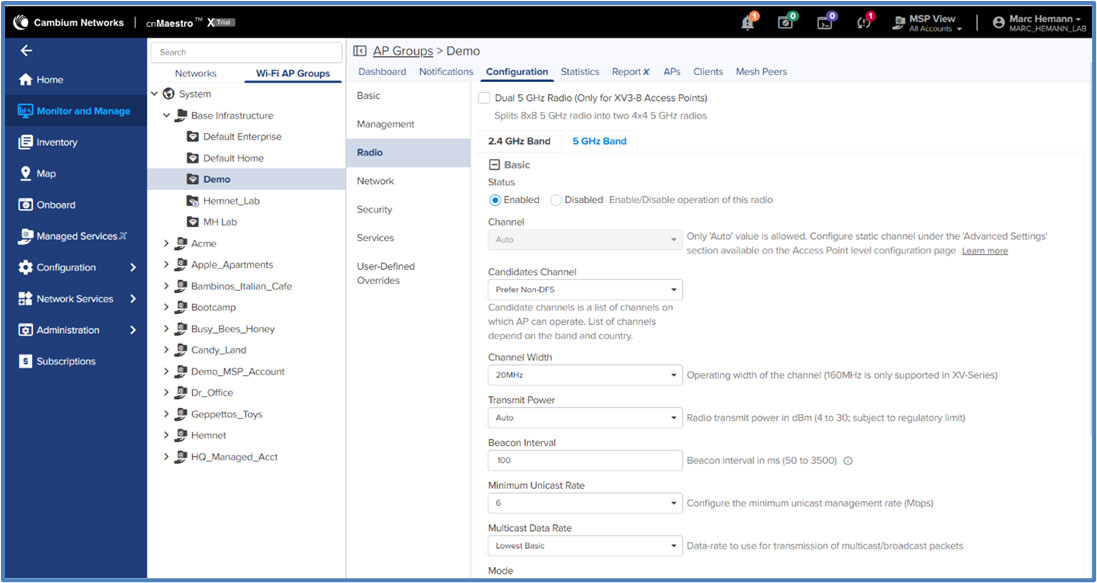
Next, select Radio. From here you will make changes to channel settings, transmit power, and affect both roaming and interference mitigation capabilities. This is where the several changes will occur from the default settings. I highly recommend following the options that I have selected below for the vast majority of deployment types.
Each radio in the AP is configured separately. Be certain to complete configuration changes for both the 2.4 GHz and 5 GHz radios. The menu starts with 2.4 GHz, so we will too.
2.4 GHz radio
Enable . From here you can choose to enable or disable the 2.4 GHz radio. There are times, especially in very high density deployments, when you may choose to disable some of the 2.4
GHz radios, using only 5 GHz. For this, you will want to create two different AP Groups. One with 2.4 GHz enabled and one with 2.4 GHz disabled.
Channel . I recommend leaving this at the default setting of auto, allowing the APs to choose their own channels based on RF conditions.
Candidates Channel . This is the place where you can assign a channel, or a series of channels to a radio.
Channel Width . I recommend using 20 MHz. It is possible to use 40 MHz, but it is rare that the 2.4 GHz environment will make this a wise choice.
Transmit Power . I recommend leaving this as Auto as well. We will make other configuration changes later that will allow the APs to best choose when to turn power down and when to turn it up.
Beacon Interval . Multicast Data Rate, Mode, and Candidates Channel. For the majority of deployments, I suggest leaving these settings at default.
Minimum Unicast Rate . Changing this value will tell the AP to advertise to all clients that it will only accept clients that can connect at this minimum MCS rate. When left at the default of 1, clients will attempt to connect at the far reach of the AP, even when conditions are poor enough that connections are not guaranteed. To make this worse, some clients tend to stay connected to an AP when they should roam to another one. By raising this value, you will shrink the cell size of each AP, but you will also do so in a manner that both ensures more solid connections between AP and client and will encourage clients to roam more quickly. At a minimum, I suggest raising this value to 2. If you want to exclude all 802.11b clients, raise this value to 12.
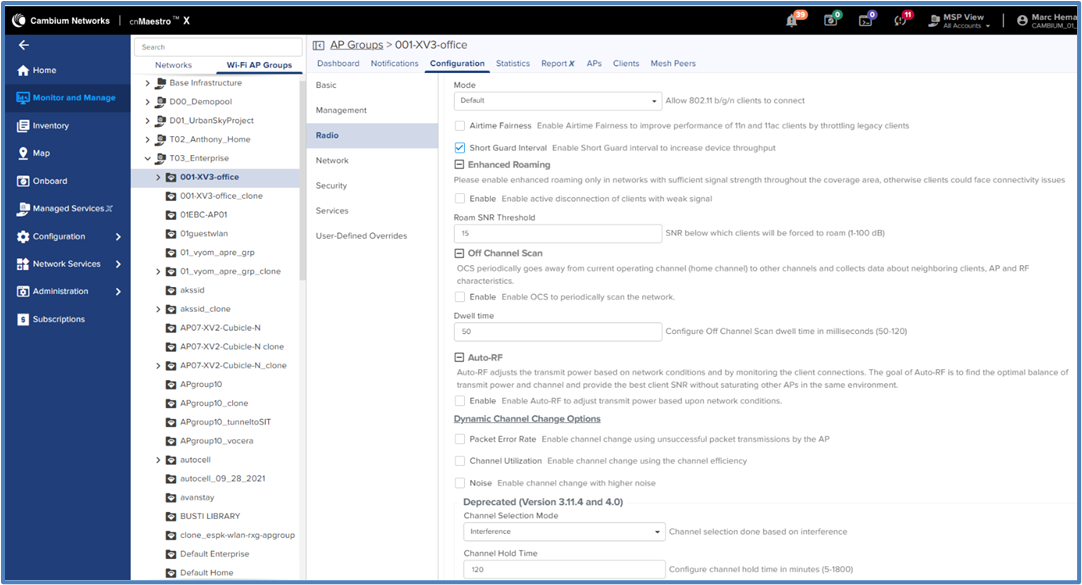
Airtime Fairness . Enable Airtime Fairness in order to prevent slower 802.11b and g clients from forcing the faster 802.11n clients down to their speed.
Short Guard Interval . This sets a short guard interval between the packets allowing for more data being passed in the same amount of time.
Enhanced Roaming . Do not enable this feature. It is a nice feature to have if you have very sticky clients, ones that absolutely refuse to roam. But it is a harsh approach that can better be served for most clients by adjusting the Minimum Unicast Rate as mentioned earlier. Fortunately, very sticky clients are quite rare today.
Off Channel Scan . Enable this feature and use the default settings. This will tell the APs to go offline very briefly to scan other channels in order to build up a reference table of which channels they can use if a channel change becomes necessary. This will not drop clients.
Auto RF . Enable this feature using the default settings. This will tell APs to turn down their power if they are in close proximity to another AP running on the same channel with enough power to cause interference. If that changes later, because one of them fails or their channel changes, the AP will then increase power again.
Dynamic Channel Change Options . This will trigger the radio to change channels if certain RF conditions currently exist. If you select any option or combination of options, you will also have to configure the thresholds that when met will trigger the radio to change channels.
Save your configuration.
5 GHz radio
Notice at the top of the page, “Dual 5GHz Radio (Only for XV3-8 Access Points)”. The XV3-8 has a software programmable 5GHz radio. It can be configured as one 5GHz radio with 8 antennas, or two 5GHz radios, with 4 antennas each. In today’s environment, where most of the client devices are .11ac with a few .11ax clients, you will want to split the radio into two 5GHz radios. If a few years, when most of the clients are .11ax, you will want to combine the radios into one 5GHz radio with 8 antennas.
Except where there are differences with the 2.4 GHz radio settings, I will not expound on the reasoning behind the recommended settings for 5 GHz below.
Channel, Transmit Power, Antenna Gain, Beacon Interval, Multicast Data Rate, and Mode. Leave at the default settings.
Channel Width . The default is 80 MHz. I strongly recommend changing this at least to 40 MHz, with 20 MHz being the best choice in most circumstances. Finding a clear channel that is smaller is much simpler than when the channels are wide. If you deploy multiple APs, you will want them to be as separated in the spectrum as they can be to maximize capacity and throughput.
Minimum Unicast Rate . Changing this is less important than it is for 2.4 GHz as the long tail of coverage seen with a 1 Mb/s rate on 2.4 GHz is much more pronounced than 6 Mb/s is on 5 GHz. However, I often find that using 12 Mb/s on 5 GHz yields the best roaming results. For good roaming, you will also want to design for good overlap of coverage at this data rate.
Candidates Channel . In most cases, leaving this at default of All is the best choice. However, if you have clients that do not support DFS channels, you can select non-DFS preferred. Or, if you are deploying outdoors and want to reserve some 5 GHz channels for PtMP radios and others for WiFi APs, you can set the list of channels from which the AP’s can choose here.
Airtime Fairness . I am unsure about Airtime Fairness in 5 GHz. Previous to the prevalence of 802.11ac clients in 5 GHz, this feature did offer good separation of client speeds, preventing the slower 802.11a clients from forcing 802.11n clients to their speed. 802.11ac, however, has measures built in, like better block acknowledgment, to prevent this from being an issue. And, it is possible for Airtime Fairness to actually slow down 802.11ac clients. My recommendation is to leave it disabled.
- Enhanced Roaming . Do not enable.
- Off-Channel Scan . Enable, using the default settings.
- Auto RF . Enable, using the default settings.
- Interference Avoidance . Enable, using the default settings.
Be sure to Save your changes.
Sites
Moving up the menu, the next stop is Sites. This step is not required, but it is helpful. You can define multiple Sites and indicate where your APs are located by assigning Sites to them. Keep in mind that an AP Group is a group of APs that share the same base configuration. If you make a change to an AP Group, that change is applied to all APs within the group. However, different APs within an AP Group can be located at different Sites. Each Site could have APs from multiple AP Groups. Each AP Group could be located across multiple Sites. Making a change to a Site will only change the Site information. Sites are like folders, they are used for organizing information.
When you Select Sites, you have the option to view previously created sites and to create a new one. Select New Site next. From here you can enter information about the site. If you type in the address in the map window, the GPS coordinates will automatically fill in. From there you can move the location icon to get an even more accurate GPS location.
You can also add a Floorplan for the site and place APs assigned to this Site in their correct location within the Floorplan. As we have not added any APs yet, though, we will skip this step for now. It should also be pointed out that, at the time this document was written, only one Floorplan per Site can be added. This means that if you have a multi-floor building and want to include floorplans for each story, you will want to create a new site per floor. The ability to add multiple floorplans per site is a feature that is planned for a future version of cnMaestro.
Be sure to save your changes.

Onboarding APs to your new AP Group
The next step is to onboard your new APs. If you have already done this, you don’t need to do this step, but you will want to assign each AP to an AP Group. In most cases, that will mean that they will all be in the same AP Group. If you started fresh and did the steps in the order I have outlined, then you can import your APs now, assign them to a Site, and assign them to an AP Group all in one step.
Click on AP Groups in the blue menu on the left. Even though you were already editing your AP Group before, this will bring you back to the main AP Group menu where you will see your newly created AP Group along with the Default Enterprise AP Group that we provide as an example. Click on the name of your AP Group and you will be brought to the Configuration page for that AP Group. Go to the Dashboard page. It won’t be very interesting initially as there are no APs assigned to it, no clients, and no traffic. But we will solve that now.
Click on the menu option in the grey bar near the top that reads APs. At this point, there will be no APs listed, but you will see a button to Claim a New AP on the right-hand side. Click on this button.
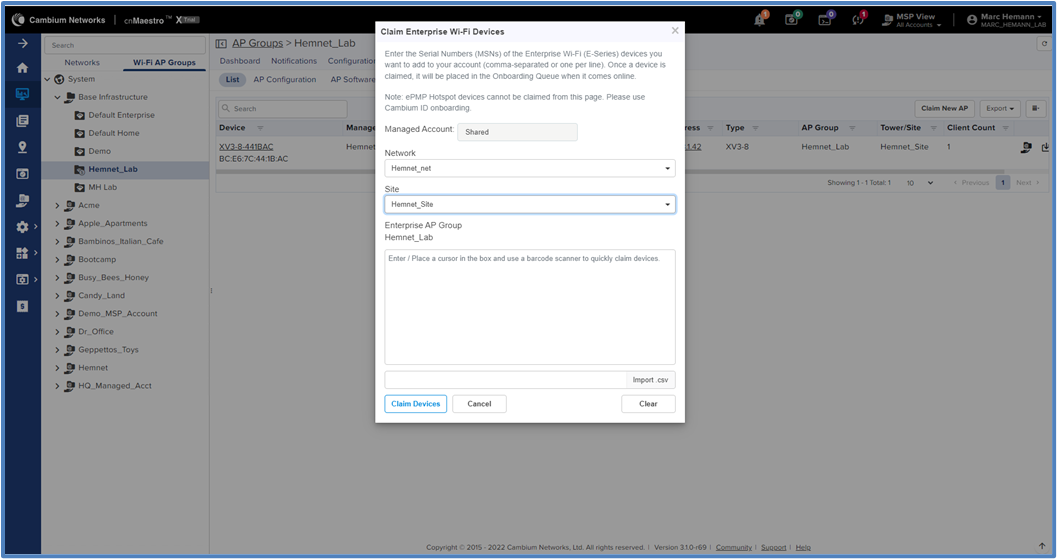
What you will see will look like what is shown above. The first thing you should note is that you have a drop-down box to select one of the Sites that you created. You do not need to assign a Site here, but if all of your APs in your AP Group are located at one Site, it is convenient to set that now.
Next, type in the MSN for each of your APs in the box. You can separate these line by line or just with a comma. You can also use a bar code scanning to scan the bar code on either the box or the AP itself for the MSNs. Save this list to a CSV file and then import it using the “Import .CSV” button. Once you have typed and/or imported your list, click on Claim Devices. You can follow the progress as they contact the public cloud and come online.
Hint. If you are impatient like me. Either do not plug in your APs until you have already entered their MSNs and clicked on Claim Devices or reboot the APs right after you do. As soon as the APs finish booting up they will reach out to cnMaestro. But if they have been plugged in a while, they will only reach out to the server every few minutes. If you are caught in the middle of this cycle, rebooting will ensure that it happens right away.
Please provide feedback on this document to marc.hemann@cambiumnetworks.com