# Guest Access using Social Login - Google - Twitter - Facebook -Office 365
**URL:** https://community.cambiumnetworks.com/t/guest-access-using-social-login-google-twitter-facebook-office-365/61910
**Category:** cnMaestro
**Tags:** knowledge-base
**Created:** [May 30, 2019, 11:14am UTC](https://community.cambiumnetworks.com/t/guest-access-using-social-login-google-twitter-facebook-office-365/61910 "2019-05-30T11:14:06Z")
**Posts on this page:** 3
**Page:** 1
### Author:  [@Gupta-Bobby](https://community.cambiumnetworks.com/u/Gupta-Bobby)
#### Post date: [May 30, 2019, 11:14am UTC](https://community.cambiumnetworks.com/t/guest-access-using-social-login-google-twitter-facebook-office-365/61910/1 "2019-05-30T11:14:06Z")
Steps to achieve cnMaestro based Guest Access using Social logins like Google, Twitter, Facebook and Office 365
1. Create GuestAccess profile on cnMaestro.
- Login to cnMaestro \>\> Navigate to Services \>\> Guest Access Portal \>\> **Add Portal**.
- Enter Portal Name, Description , enable logging for client login events and click on **Save**

Click on **Edit Guest Portal Details**

Navigate to **Access** tab and expand **Social Login**

Select Google, Twitter, Facebook, Office 365 based on your requirement:
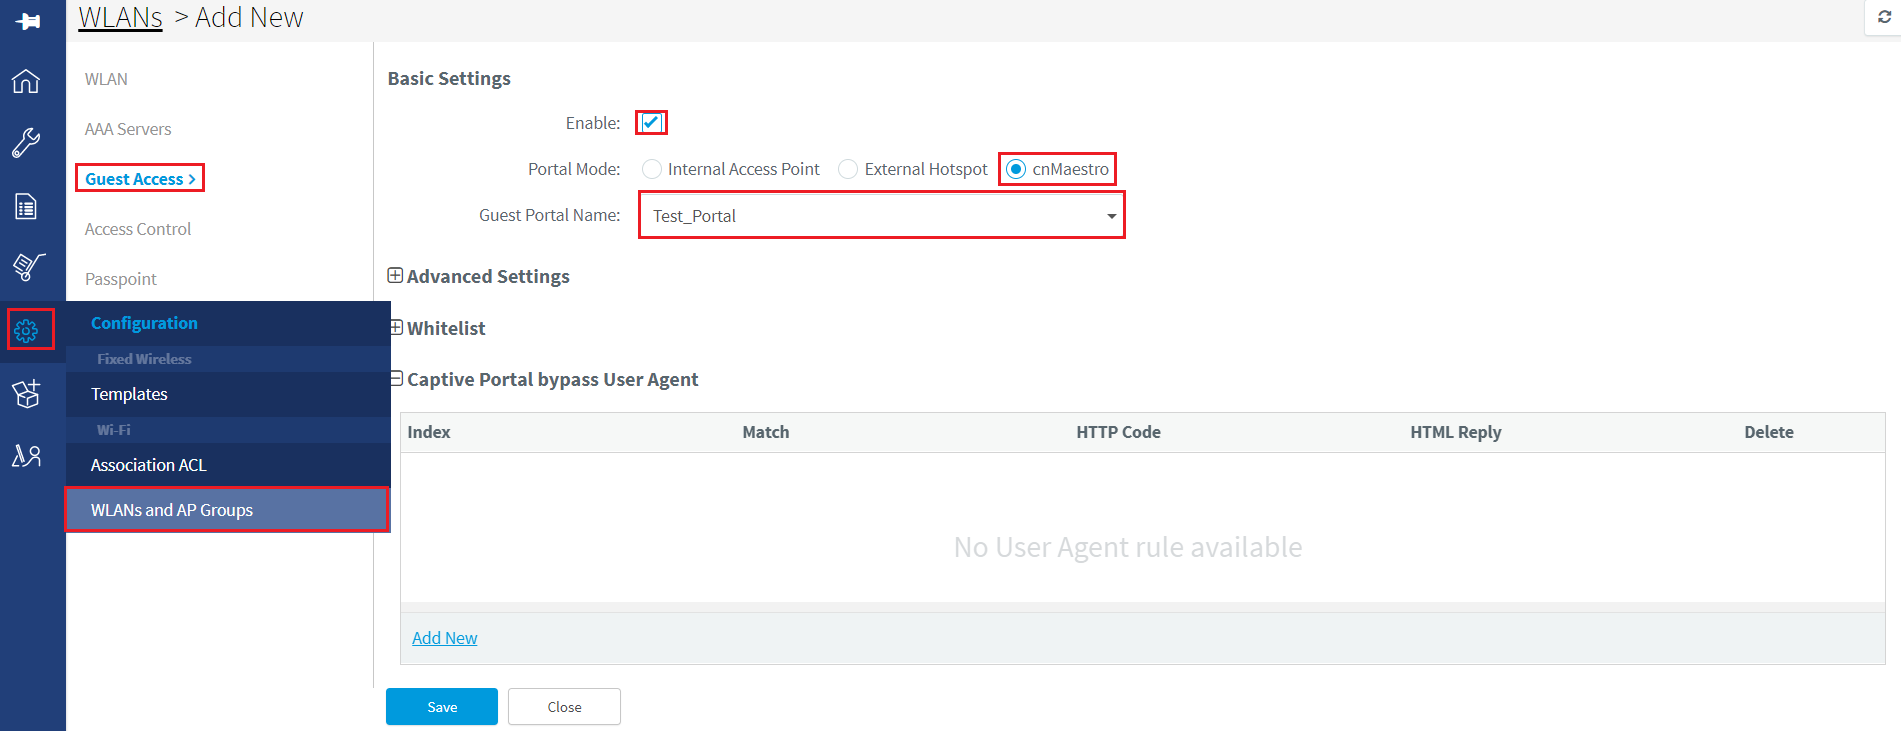
1. ****2. Map the Guest Access Portal to the required existing WLAN or to a new WLAN.
- Click on Configure \>\> WLANs and AP Groups \>\> click on edit WLAN / Add New WLAN
- Navigate to Guest Access tab \>\> Enable tick box \>\> select cnMaestro in Portal Mode \>\> select the Guest Portal from the drop down under Guest Portal Name.
3. Creating APIs to integrate cnMaestro with Google, Twitter, Facebook and Office 365.
a) **Google**
- Login to Google Account and navigate to URL : [https://console.developers.google.com](https://console.developers.google.com)
- Click on **Select a Project** and create a **New Project**

Give a name to the Porject and click on **CREATE**.
****
Click on **Credentials** under this project.

Under Credentials tab create **OAuth Client ID.**

Configure Consent Screen

Assign a name to the application, map to the an **email ID,** add **cambiumbnetworks.com** to the authorized domain and click on **Save**.

Once clicked on **Save** for above page it redirects to creation of **OAuth Client ID**.
Select Application type as **Web Application,** give a **Name** , add **Guest Portal Hostname** url/IP which you will get from cnMaestro UI and click on **Create**.
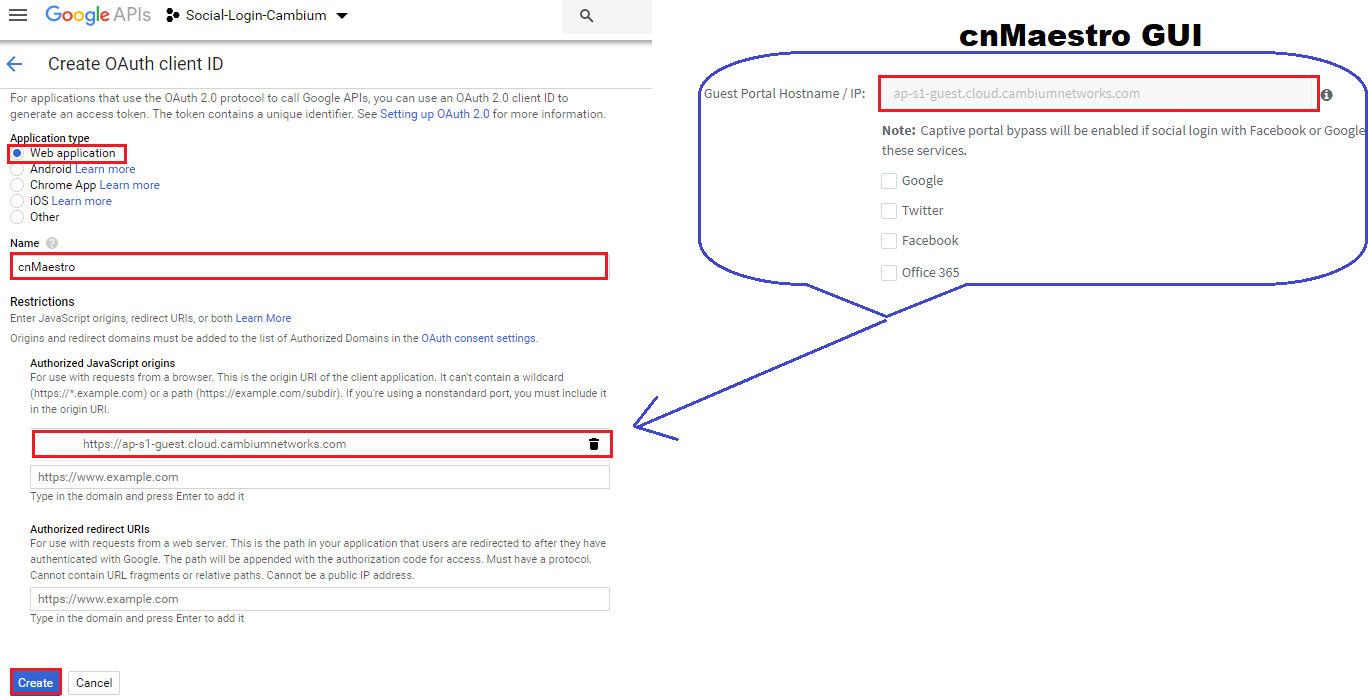
Upon click on **Create** on above page it redirects to the screen showing **Client ID** and **Client Secret**.

Copy the **Client ID** and paste it to the cnMaestro enabling **Google** under Social Logins and click on **Save.**

b) **Twitter**
Login to Twitter Account and navigate to URL : [https://developer.twitter.com/en/apps](https://developer.twitter.com/en/apps) and click on **Create an app.**


Click on **Keys and tokens** and copy **Consumer API Key** and **Consumer API Secret Key.**

Paste them to cnMaestro GUI for **Twitter** social login.

c) **Facebook**
Login to Facebook Account and navigate to URL : [https://developers.facebook.com/apps/](https://developers.facebook.com/apps/) and click on **Add a New app.**

Enter App **Display Name,** **Contact Email** and click on **Create App ID.**

Select a Scenario as **Integrate Facebook Login** and click on **Confirm**.

Navigate to **Settings** tab under **Facebook Login** , add **Facebook Reply URL** from cnMaestro to **Valid OAuth Redirect URLs** section, change **Login from Devices** to **Yes** and click on **Save Changes**.

Navigate to **Settings** \> **Basic** and copy **App ID** and **App Secret**. Enter **Privercy Policy URL** as your company URL. Make sure the APP status shows **Live**


Navigate to **Settings \>\> Basic** and copy **App ID** and **App Secret**.
****
d) **Office 365**
Login to Office 365 Account and navigate to URL : [https://apps.dev.microsoft.com/](https://apps.dev.microsoft.com/) and click on **Add an app**.

****
Upon Adding your App name and clicking on **Create application** , it redirectes to App page.
1. Copy **Application ID** and paste it to cnMaestro Guest Access page under **Office 365**
2. Click on **Generate New Password**.
3. Copy **Reply URL** from cnMaestro and paste it under **Redirect URLs**
4. Add **my.centrify.com** to the Whitelist on the cnMaestro.

Sample of client login page:

---
### Author:  [@Simon\_King](https://community.cambiumnetworks.com/u/Simon_King)
#### Post date: [December 20, 2020, 8:37am UTC](https://community.cambiumnetworks.com/t/guest-access-using-social-login-google-twitter-facebook-office-365/61910/2 "2020-12-20T08:37:18Z")
A post was split to a new topic: [Guest Access Portal Social Login capabilities](https://community.cambiumnetworks.com/t/guest-access-portal-social-login-capabilities/74983)
---
### Author:  [@Simon\_King](https://community.cambiumnetworks.com/u/Simon_King)
#### Post date: [April 13, 2021, 9:50am UTC](https://community.cambiumnetworks.com/t/guest-access-using-social-login-google-twitter-facebook-office-365/61910/3 "2021-04-13T09:50:39Z")
A post was split to a new topic: [Problem configuring Facebook login for guest access](https://community.cambiumnetworks.com/t/problem-configuring-facebook-login-for-guest-access/77744)