# Integrating open LDAP with cnMaestro
**URL:** https://community.cambiumnetworks.com/t/integrating-open-ldap-with-cnmaestro/61162
**Category:** cnMaestro
**Created:** [April 10, 2019, 5:57am UTC](https://community.cambiumnetworks.com/t/integrating-open-ldap-with-cnmaestro/61162 "2019-04-10T05:57:08Z")
**Posts on this page:** 6
**Page:** 1
### Author:  [@Support\_Kumar](https://community.cambiumnetworks.com/u/Support_Kumar)
#### Post date: [April 10, 2019, 5:57am UTC](https://community.cambiumnetworks.com/t/integrating-open-ldap-with-cnmaestro/61162/1 "2019-04-10T05:57:08Z")
**1. **** Overview**
This document presents basic configuration for cnMaestro Authentication Server Type with LDAP using the Ubuntu LDAP Server.
2. ** Introduction**
LDAP, or Lightweight Directory Access Protocol, is a protocol for managing related information from a centralized location through the use of a file and directory hierarchy.
It functions in a similar way to a relational database in certain ways, and can be used to organize and store any kind of information. LDAP is commonly used for centralized authentication
**3. Installation**
** Server Requirements:**
Ubuntu 16.04.4 LTS (GNU/Linux 4.4.0-116-generic x86\_64)
Assume that our LDAP server will be hosted on a machine with the FQDN of myldap.test.com
Step-1: sudo hostnamectl set-hostname myldap
Step-2: sudo nano /etc/hosts
127.0.1.1 myldap.test.com myldap
127.0.1.1 localhost
Step-3: sudo apt-get update
Step-4: sudo apt-get install slapd ldap-utils
You will be asked below questions about how you'd like to configure
- Omit OpenLDAP server configuration? **No**
- DNS domain name? **test.com**
- Organization name? **MYCOMPANY** Administrator password?
_ Note: Use the password you configured during installation, or choose another one _
- Database backend to use? **HDB**
- Remove the database when slapd is purged? **No**
- Move old database? **Yes**
- Allow LDAPv2 protocol? **No**
Step-5:
sudo apt-get install phpldapadmin
Step-6: sudo nano /etc/phpldapadmin/config.php
Search for the following sections and modify them accordingly
- $servers-\>setValue('server','host','domain\_nam\_or\_IP\_address');
- $servers-\>setValue('server','base',array('dc=test,dc=com'));
- $servers-\>setValue('login','bind\_id','cn=admin,dc=test,dc=com');
Save and close the file
Step-7: sudo apt-get install gnutls-bin ssl-cert
Step-8: To create CA Template
sudo mkdir /etc/ssl/templates
cn = LDAP Server CA
ca
cert\_signing\_key
Step-9: Create the LDAP Service Template
sudo nano /etc/ssl/templates/ldap\_server.conf
organization = "MyCOMPANY"
cn = myldap.test.com
tls\_www\_server
encryption\_key
signing\_key
expiration\_days = 3652
Step-10: Create CA Key and Certificate
- sudo certtool -p --outfile /etc/ssl/private/ca\_server.key
- sudo certtool -s --load-privkey /etc/ssl/private/ca\_server.key --template /etc/ssl/templates/ca\_server.conf --outfile /etc/ssl/certs/ca\_server.pem
Step-11: Create Service Key and Certificate
- sudo certtool -p --sec-param high --outfile /etc/ssl/private/ldap\_server.key
- sudo certtool -c --load-privkey /etc/ssl/private/ldap\_server.key --load-ca-certificate /etc/ssl/certs/ca\_server.pem --load-ca-privkey /etc/ssl/private/ca\_server.key --template /etc/ssl/templates/ldap\_server.conf --outfile /etc/ssl/certs/ldap\_server.pem
Step-12: sudo usermod -aG ssl-cert openldap
Step-13: sudo chown :ssl-cert /etc/ssl/private/ldap\_server.key
Step-14: sudo chmod 640 /etc/ssl/private/ldap\_server.key
Step-15: Configuring LDAP to use the CA and Keys
nano addcerts.ldif
dn: cn=config
changetype: modify
add: olcTLSCACertificateFile
olcTLSCACertificateFile: /etc/ssl/certs/ca\_server.pem
-
add: olcTLSCertificateFile
olcTLSCertificateFile: /etc/ssl/certs/ldap\_server.pem
-
add: olcTLSCertificateKeyFile
olcTLSCertificateKeyFile: /etc/ssl/private/ldap\_server.key
Step-16: sudo ldapmodify -H ldapi:// -Y EXTERNAL -f addcerts.ldif
Step-17: sudo service slapd force-reload
Step1-18: sudo cp /etc/ssl/certs/ca\_server.pem /etc/ldap/ca\_certs.pem
Step-19: sudo nano /etc/ldap/ldap.conf
. . .
TLS\_CACERT /etc/ldap/ca\_certs.pem
. . .
Save and close the File
Step-20: ldapwhoami -H ldap:// -x -ZZ
Step-21: Lastly check /etc/default/slapd and make sure services contains ldaps:///:
SLAPD\_SERVICES="ldap:/// ldapi:/// ldaps:///"
Restart slapd services
**4.** **Log Into the Web Interface**
Step-1: User can log in to Web Interface by using
- domain\_name\_or\_IP\_address/phpldapadmin

Step-2: Click Login and enter Login DN and Password used while configurating LDAP setup.

Step-3: After logging in Create OU, Groups and Users

Step-4: Create Organizational Units
Select the specific dc name where the users will be created and click on “Create a child entry”, then select the Generic: Organisational Unit
 
Step-5: Create Groups
Select OU and click on **Create a child entry** , then select **Generic: Posix Group**


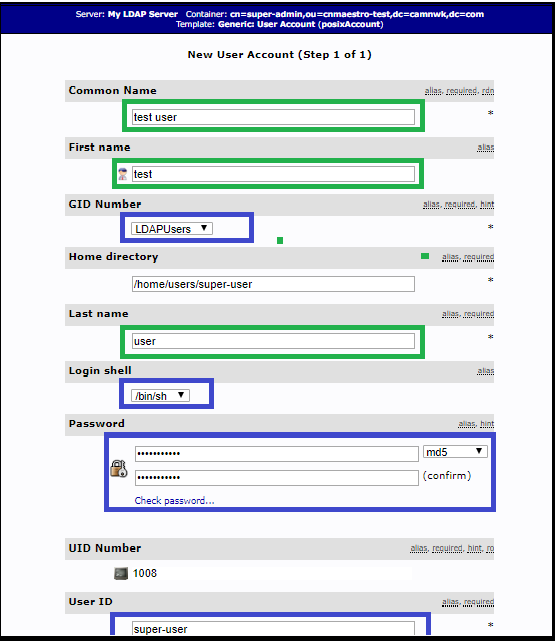
Step-6: Create Users
Select **User Group** created and click on **Create a child entry** , then select **Generic: User Account**
Click on **“Create Object”** and then **“Commit”** to save the settings.

Step-7: Add a new attribute for users to support as per the “Roles” defined in the cnMaestro
Click on “ **Add new attribute** ”, select employee type and enter the role attribute which matches the cnMaestro configuration.


Note:
Value in employeeType should match with the one of the Role Mappings of cnMaestro

Note:
Existing LDAP setup users can add a new custom attribute employeeType and configure the values as per cnMaestro Role mappings values.
**5. Configure cnMaestro**
Navigate to **Application \> Users \> Authentication Servers** in the cnMaestro On-Premises UI to add the LDAP Server details.

- Make sure the **_IP Address/Hostname_** field value is the FQDN of LDAP server
- Suffix is the distinguished Name of LDAP server in dc=xyz, dc=xyz format.
Example: dc=camnwk and dc=com
- Base DN is login DN in cn=admin, dc=xyz, dc=xyx format
Example: cn=admin, dc=camnwk and dc=com

- LDAP Password is server password configured during installation.
- Enable SSL/TLS and upload the root certificate.
- The employeeType field must be configured according to role-mappings in cnMaestro configuration authentication configuration page and vice versa.
- Navigate to **Application \> Users \> Authentication** and set the **Primary Authentication** to be the LDAP server just created.
** - Secondary Authentication** will be automatically set to Local Users, which means if the LDAP server is not reachable, the UI can be accessed using the Local Users database (so it is important to change the default password).
- If you are unable to log into the UI, you can create a One-Time password in the CLI in order to resolve the issue. (See the User Guide for details on **Application Account Recovery** ).
Here is the link to download the user guide:
[https://support.cambiumnetworks.com/files/cnmaestro/](https://support.cambiumnetworks.com/files/cnmaestro/)
6. **Log into cnMaestro**
- Open a new browser and log into cnMaestro using the new username and password.
Login should work without any issue for the new user created.
---
### Author:  [@Antonio\_Bartolini](https://community.cambiumnetworks.com/u/Antonio_Bartolini)
#### Post date: [April 10, 2019, 7:13am UTC](https://community.cambiumnetworks.com/t/integrating-open-ldap-with-cnmaestro/61162/2 "2019-04-10T07:13:36Z")
Great Guide!
---
### Author:  [@innova](https://community.cambiumnetworks.com/u/innova)
#### Post date: [March 16, 2021, 7:45am UTC](https://community.cambiumnetworks.com/t/integrating-open-ldap-with-cnmaestro/61162/3 "2021-03-16T07:45:26Z")
Is it possible to implement LDAP search filters?
That is to limit to only specific AD groups can login (with “memberOf”).
I think currently the only distinction is by “employeeType”.
But I cannot have 2 cnMaestro instances with different role on each for a user.
---
### Author:  [@Dlahiru](https://community.cambiumnetworks.com/u/Dlahiru)
#### Post date: [November 9, 2021, 9:54am UTC](https://community.cambiumnetworks.com/t/integrating-open-ldap-with-cnmaestro/61162/4 "2021-11-09T09:54:08Z")
does LDAP support at essential version ?
---
### Author:  [@Support\_Kumar](https://community.cambiumnetworks.com/u/Support_Kumar)
#### Post date: [November 9, 2021, 10:06am UTC](https://community.cambiumnetworks.com/t/integrating-open-ldap-with-cnmaestro/61162/5 "2021-11-09T10:06:05Z")
@Dlahiru
Yes, it does support essential version.
---
### Author:  [@Dlahiru](https://community.cambiumnetworks.com/u/Dlahiru)
#### Post date: [November 11, 2021, 7:38am UTC](https://community.cambiumnetworks.com/t/integrating-open-ldap-with-cnmaestro/61162/6 "2021-11-11T07:38:42Z")
Thanks , local user creation restricted with \_ character , AD user format unable to change ?