Summary
This article illustrates the steps to perform a zero-touch deployment of a new cnMatrix switch. Following the zero-touch setup on cnMaestro, the switch can be connected to the network, at which time the switch will automatically onboard to cnMaestro and obtain its remote configuration. No local pre-configuration is required on the switch.
Topology
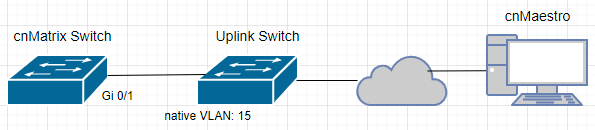
- cnMatrix switch connects to the uplink switch via local port Gi 0/1
- The uplink switch port connected to cnMatrix is configured with native VLAN 15
- The network has management VLAN 15 (for example)
- VLAN 15 is present in the Switch Group
Configuration
-
Log in to your cnMaestro account and claim the switch’s serial number on the Onboard page
-
Do not click the ‘‘Approve’ button. Select the Pen icon to Edit.
-
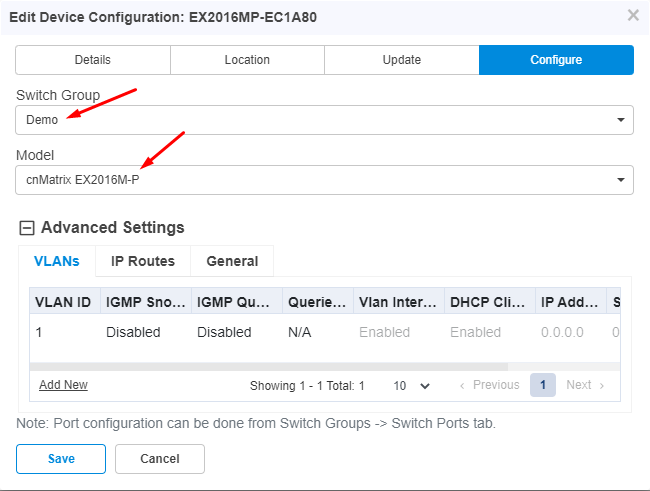
Assign the switch to the Switch Group and provide the model type.
Note: Create the Switch Group prior to this step if it does not already exist.
-
Edit and disable the VLAN 1 interface
-
Select Vlan Interface
-
De-select Enable Administrative State
-
Click Update button
Note: This step is not required if the management VLAN is VLAN 1
-
-
Click the Add New button to create the VLAN 15 interface and enable DHCP for the VLAN
-
Select 15 from the drop-down menu
-
Select Vlan Interface
-
Select Enable Administrative State
-
Select DHCP Client
-
Click Add button


Note: You can also assign a static IP address instead of using the DHCP client. To assign a static IP address, don’t select DHCP Client, and enter the IP Address and Netmask.
 Important: When defining a static IP address, the default gateway and DNS must already be
configured in the Switch Group. Without the default gateway and DNS settings, the switch will
lose connectivity to cnMaestro.
-
-
Click the Save button
-
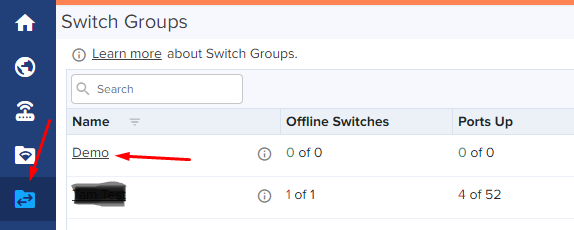
Click the Switch Group icon and select the Switch Group
-
Click the Switch Ports tab
-
Click port 1 and edit the VLAN setting. Click the Save button.

-
Navigate back to the Onboard page.
-
Click the Approve button.
-
Connect port 1 of the new cnMatrix switch to the uplink switch.


