Hi we just bought 5 new TX1012-P-DC’s, the first one I opened I manged to login via the default address, updated the firmware, rebooted. All good. Turned it off. Next day, can’t get in. Won’t get IP from DHCP and can’t ping/access on the 192.168.1.1 address. So I got another one out of the box, this one I can’t even get in straight off the bat. Not getting a DHCP and can’t see it on 192.168.1.1. So I figure, factory reset. But where is the little reset button? I can’t find it, and nothing in the manual says how to-do this. Can anyone advise on this or seen similar issues?
Having a similar issue. Factory reset. Configured the cloud details. saved and rebooted.
Won’t get DHCP and no response from 192.168.1.1. Using the AC Model
Hi Keith, the TX10xx family does not come with the reset button. You can factory reset the switch if the switch is on the cloud. By default the switch will get DHCP address and connect to the cloud without any manual configuration. You need to claim the switch in your account.
An alternative way to do a factory reset requires serial connection to the switch. Can you raise a ticket and let me know the ticket number so I can immediately assist you?
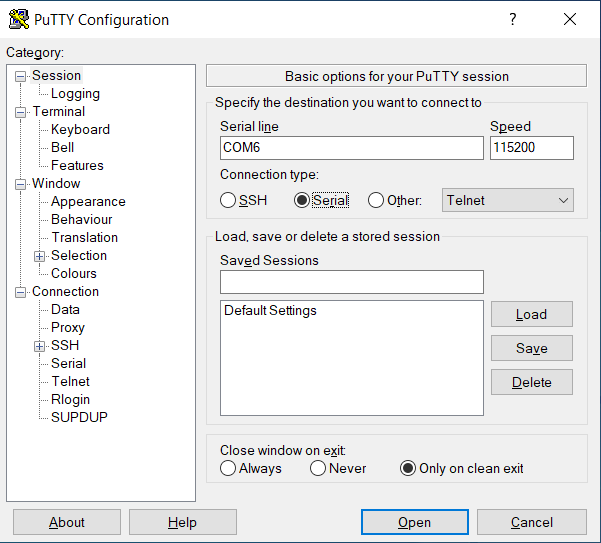
I have a problem with the same model of the switch in which I am unable to login and is now needing to reset to factory default to regain access. However, there is no reset button and when I connect via console, it doesn’t allow me to get the # prompt during the boot process. Can you advise what setting should I set in my Putty Serial. I tried 115200 8 N 1 and no Flow Control and also 9600 8 N 1 and No Flow control.
It seems like the firmware version is older than 4.4.
Image Name: 4.2.1-r5
Is there anyway to reset it?
BootROM 1.41
Booting from SPI flash
BootROM: Image checksum verification PASSED
Booting...
Serial Number : XLZF06ZQDVTQ
Resets : 12
Mac Address : BC:E6:7C:A2:F8:60
Boot Version : 1.3.00.08
============================================
Power-On Self Tests
============================================
Testing main memory -
DDRAM Data Bits - PASSED
DDRAM Address Bits - PASSED
DDRAM Walking 1/0s (#193) - PASSED
SWITCH Register - PASSED
PHYs Register - PASSED
FAN Status - PASSED
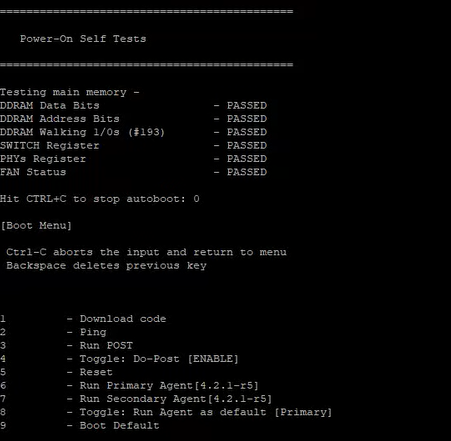
Hit CTRL+C to stop autoboot: 0
UBI: mtd1 is detached from ubi0
Creating 1 MTD partitions on "nand0":
0x000000020000-0x000007f00000 : "mtd=1"
UBI: attaching mtd1 to ubi0
UBI: physical eraseblock size: 131072 bytes (128 KiB)
UBI: logical eraseblock size: 126976 bytes
UBI: smallest flash I/O unit: 2048
UBI: VID header offset: 2048 (aligned 2048)
UBI: data offset: 4096
UBI: attached mtd1 to ubi0
UBI: MTD device name: "mtd=1"
UBI: MTD device size: 126 MiB
UBI: number of good PEBs: 1014
UBI: number of bad PEBs: 1
UBI: max. allowed volumes: 128
UBI: wear-leveling threshold: 4096
UBI: number of internal volumes: 1
UBI: number of user volumes: 5
UBI: available PEBs: 9
UBI: total number of reserved PEBs: 1005
UBI: number of PEBs reserved for bad PEB handling: 10
UBI: max/mean erase counter: 17/7
Read 0 bytes from volume Agent-1 to 02000000
No size specified -> Using max size (30920988)
\## Booting kernel from Legacy Image at 02000000 ...
Image Name: 4.2.1-r5
Image Type: ARM Linux Kernel Image (uncompressed)
Data Size: 30920908 Bytes = 29.5 MiB
Load Address: 00008000
Entry Point: 00008000
Verifying Checksum ... OK
Loading Kernel Image ... OK
OK
Starting kernel ...
starting pid 1073, tty '': '-/etc/init.sh'
Allocating 32784 bytes for DMA
Allocating 32768 bytes for DMA
Allocating 32000 bytes for DMA
Allocating 3200 bytes for DMA
Allocating 309601 bytes for DMA
Allocating 65539 bytes for DMA
Creating log file /persist/swconf/LogDir/fsir.log
LR {42949380}
This switch software is implemented using Open sources from OpenSSL,OpenSSH,and other open source community.
To see a full description, type "show system acknowledgement"
Cambium Networks cnMatrix TX1012-P-DC Ethernet Switch
Allocating 10759 bytes for DMA
MSR {1728} Feb 25 14:04:20 2022 Restoration successfully completed
Apache-SW001 login: admin
Password:
From the output you shared, you’ll notice the prompt “Hit CTRL+C to stop autoboot: 0”.
When you press CTRL+C at that stage, a menu will appear — from there, select option ‘9’ to perform a factory reset of the switch.
The switch may have the older boot firmware installed which option 9 was not supported. If this is the case, you need to first upgrade the boot firmware. We can help you with the upgrade.