Summary:
This article illustrate us how to concatenated certificates from a trusted certificate authority, and map the FQDN (fully qualified domain name) used to access cnMaestro On-premises server and this allows browsers to trust the Guest Access Portal without a warning.
Cause:
cnMaestro On-Premises generates a self-signed certificate when it boots the first time. Because the root CA is not present in standard browsers, cnMaestro users (administrators or Captive Portal customers) receive an SSL error message as shown below. We have the server cert in .crt or .cer extension signed by the CA along with other files included which corresponds to their internal and external CAs. 
To fix the browser error, cnMaestro needs to host a certificate from a trusted certificate authority, and map the FQDN (fully qualified domain name) used to access cnMaestro.
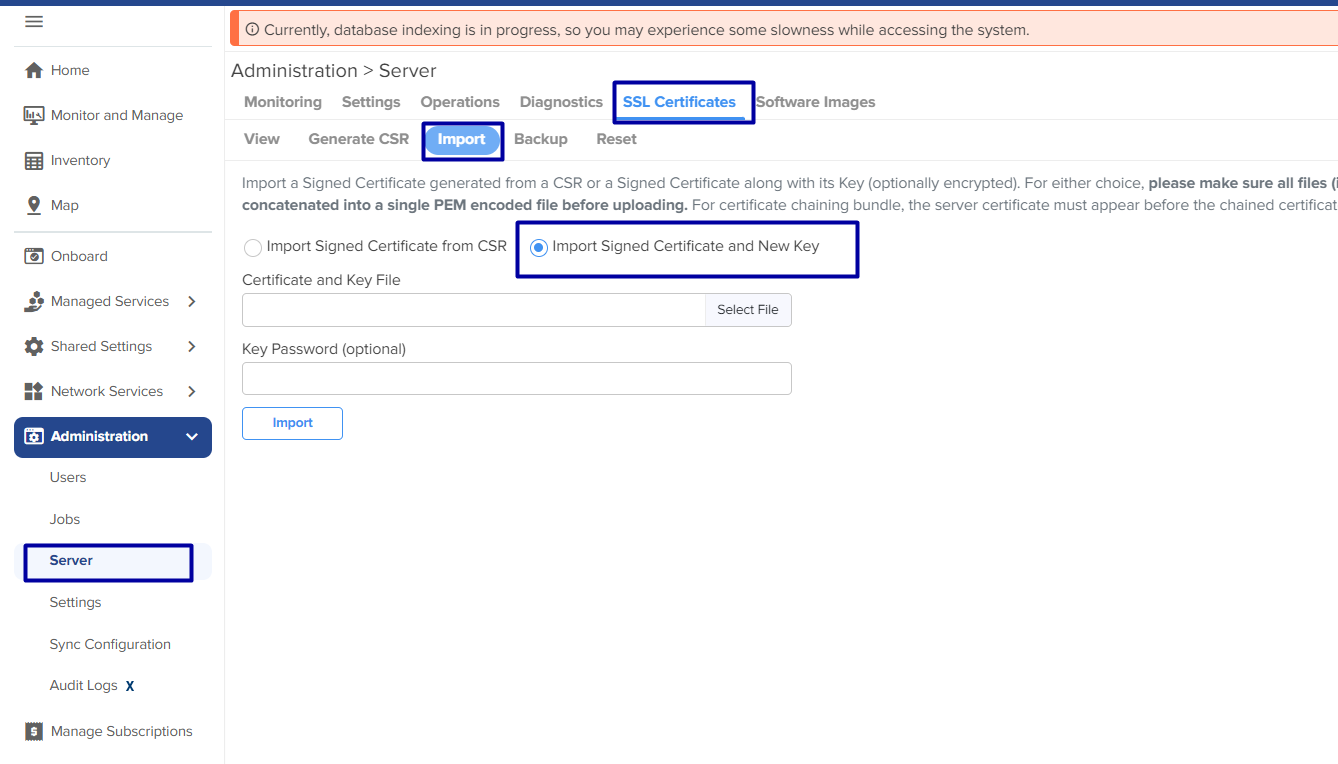
This requires the administrator to export a CSR (Certificate Signing Request) and import the signed CA-signed Server Certificate (along with private key, intermediate and Root CA certificate) back into cnMaestro.
Note:
Please refer to the user guide on how to generate the CSR under the “SSL Certificate” section. It also explains on how to import and export certificates to/from the server.
Here is the link to download the user guide:
https://support.cambiumnetworks.com/files/cnmaestro/
Solution:
The Certificate, and any optional intermediate certificates should be appended and stored in a single
PEM-encoded file prior to submission. The signed Certificate should be positioned at the top of the file, followed by any intermediate certificates.
When importing a Certificate and Key, a single PEM-encoded file should be submitted with entries in the following order:
Server Certificate, intermediate certificates, and Key. If the Key is encrypted, a password should be provided in the text box on the UI page at the time of import.
Here is an Example:
This illustrate how to upload concatenated certificates with the private key. You would get multiple files from your internal CA along with the signed certificate. Say for example:
- Private key password (in text document)
- Signed Server Certificate key
- Intermediate CA1
- Intermediate CA2
- External CA-Root CA
Once you get the above files, please make sure we open each file and that would help you to verify who singed which certificate and how many intermediate CAs are involved.
Private Key Password:
- Select any one of the below options:
- Import signed Certificate from CSR à entering private key password is not required
- Import signed Certificate and new Key
If you choose the second option, then we need to enter the private key password under SSL Certificates >> Import >> Key Password option as shown below.
Server Certificate signed by Intermediate CA-1:
- If you open the Server Certificate you would find the Intermediate CA who has signed the server certificate as shown below.
Issued to=/OU=Domain Control Validated/CN=*.cambiumnetworks.com
Issuer=/C=US/ST=Chicago/ L=Illinois/O= Cambium Networks/CN=Cambium RSA Domain Validation Secure Server CA

Intermediate CA-1 signed by Intermediate CA-2:
- If you open the Server CA you would find the other Intermediate CA who has signed the Server CA as shown below.
Subject=/C=US/ST= Chicago/L=Illinois/O=Cambium Networks/CN= Cambium RSA Domain Validation Secure Server CA
Issuer=/C=US/ST= Chicago/L=Illinois City/O= The USERTRUST Network/CN=USERTrust RSA Certification Authority

Intermediate CA-2 signed by Root CA:
- If you open the Intermediate CA you would find the External Root CA who has signed the intermediate CA as shown below.
Subject=/C=US/ST=/L=Illinois City/O=The USERTRUST Network/CN=USERTrust RSA Certification Authority
Issuer=/C=US/O=AddTrust AB/OU=AddTrust External TTP Network/CN=AddTrust External CA Root

External Root CA Certificate Key:
- Finally one of the certificate file would be from External CA as stated below.
Subject=/C=US/O=AddTrust AB/OU=AddTrust External TTP Network/CN=AddTrust External CA Root
Issuer=/C=US/O=AddTrust AB/OU=AddTrust External TTP Network/CN=AddTrust External CA Root
- Finally, verify all the files before you import a concatenated Certificate and the private key password, please make sure single PEM-encoded (xxx.pem) file should be submitted with entries in the following order:
Certificate, intermediate certificates, and Key. If the Key is encrypted, a password should be provided in the text box on the UI page at the time of import.
Here is an example concatenated file format:
Note:
No spaces or other extra information are in place when you concatenate the files.

To convert a .p7b file to a .pem file:
To convert a .p7b file to a .pem file, we can use OpenSSL.
Command : openssl pkcs7 -inform DER -outform PEM -in .p7b -print_certs > .pem

To convert a .pem file to .crt file:
Go to file directory > Select respective .pem file > Right click > Rename > Rename it to .crt
Note: Before importing in On-prem, Open .crt file using notepad and remove subject and Issuer details.