Overview
This document presents basic integration configuration of Cisco ISE Server 2.4.0.357 as RADIUS server to access cnMaestro.
Pre-requisites
- CISCO ISE Server Installed on ESXI VM
- Latest Chrome browser (Version 115.0.5790.110 or above)
Step1: Adding new RADIUS Vendor
- Navigate to Policy > Policy Elements > Dictionaries > System > Radius > RADIUS Vendors

- Click on +Add and provide proper details in the required fields, then click on Submit.

Note : To create Cambium as Radius Vendor, Please use 17713 as Vendor ID.

Note: Here We are not creating new Vendor. We will be using existing one .i.e. Cisco
Step2: Adding Network Device Profiles
- Navigate to Administration > Network Resources > Network Device Profiles

- Click +Add and Provide valid details.

- Select RADIUS under supported protocols, Add the newly created RADIUS Vendor then Click Submit.

Step3: Adding Network Device
- Navigate to Administration > Network Resources > Network Devices
- Click +Add

- Provide Name, description, IP Address/Range, select the newly created device profile.
- Let Network device group values be default.
- Enable Radius Authentication Settings and configure Shared secret.
- Click Save

Step 4: Creating User Identity Groups
- Navigate to Identity Management > Groups > User Identity Groups

- Click +Add and Enter a group name and submit.
- Create User Identity Group for each role i.e. super-admin, admin, operator and monitor.

Step 5: Creation of Users Identities
- Navigate to Administration > Identity Management > Identities > Users

- Click + Add and provide the details as mentioned below
- Name: Name of the user (need to be unique)
- Status: Enabled by default
- Email: Email address of the user
- Login Password: Password as per password policy
- User Info and Account options: fill as per details available
- User Groups: Map to corresponding user groups created
- Click Submit

Step 6: Selection of Authentication Protocols
- Navigate to Policy > Policy Elements > Results

- Navigate to Authentication > Allowed Protocols

Note: Use existing Default Network Access or Create your own network access profiles with the custom allowed protocols.
- We are going to use Default settings for configuration.
- Click on +Add to create New Allowed Protocols services

Step7: Creation of Authorization Profiles
- Navigate to Policy > Policy Elements > Results

- Navigate to Authorization > Authorization Profiles and click + Add

- Fill the Mandatory details as below
- Name: Provide valid name
- Access Type: ACCESS_ACCEPT
- Network Device Profile: Select the profile you created for Radius
- Advanced Attributes Settings: Click on Dropdown > Click on Cisco > Search for role > Select Role–[209]
- Verify under Attribute Details.


Step8: Creation of Policy Sets
- Navigate to Policy > Policy Sets

- Click on + symbol and Add the rules

- Select Allowed protocols as Default Network Access

- Click on + symbol and select the profile
- From Editor > Click to add an attribute
- Click on Network Device Profile
- Click from list or type > Select Profile we created > Click on Use


- Click on Save
- Select the new policy > click on Authentication policy and use Internal users

- Click on Authorization policy- Local Exceptions and create a rule for user belonging to a particular group using + Symbol

- Click on + symbol to add Identity Group Name.

- From Editor, Click on “Click to add an attribute” field > Identity Groups > Select IdentityGroup Name → Click on Use

- For Profiles, Click on dropdown, Select the authorization profile we created.

- Save the policy.
Step 9: Configuration of cnMaestro
- Login to cnMaestro > Navigate to Administration > Users > Authentication > External > Click on “Add New” to add new Authentication server.

- Add the details in Add Authentication server page.
- Authentication Server Name - Provide a Valid name
- Authentication Server Type - Select Radius as Type from Dropdown.
- IP Address/Hostname - IP Address/Hostname of Cisco ISE
- Port - Default port 1812 will be selected by default.
- Shared Secret - Shared secret we configured while creating Network Device in Cisco ISE (Path- Cisco ISE > Administration > Network Resources > Network Devices > Click on created Network Device > RADIUS Authentication Settings)
- Under Role Mappings - Role Mappings values must be same as the values configured under Roles of each Authorization policy in ISE. (Path - Cisco ISE > Policy > Results > Authorization Profiles > Click on profile > Advanced Attributes Settings)
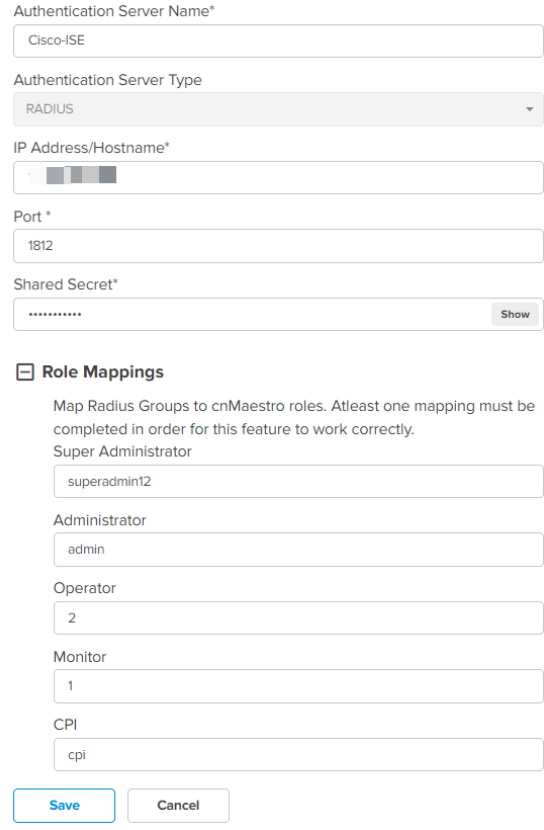
- Once New Authentication server is added, Set Primary as Authentication Priority

Step 10: Logging in to cnMaestro
- Use the credentials we configured while creating Network Access Users (in Cisco ISE) to login to cnMaestro.
- If any Issue with cnMaestro login via External/Local authentication, Use One-Time password via CLI to login to cnMaestro. For Detailed steps, Refer Application Account Recovery section from cnMaestro On-Prem User Guide. Cambium Support page link - https://support.cambiumnetworks.com/files/cnmaestro/
Step 11: Troubleshooting User Login Issues
- Login to ISE server > Navigate to Work Centers > Passive ID > Troubleshoot
- Start TCP dump before client connects to RADIUS server.
- Stop TCP dump once client disconnects and download the file.
- Wireshark or any other sniffers can be used to analyze the dump.

- Navigate to Live Logs under Operations > RADIUS > Live Logs - To check logs of client trying to contact Cisco ISE for authentication.

- For detailed steps, Click on icon under Details in Radius live logs table.
