Quick Start Guide
60 GHz cnWave E2E Controller Installation
Desktop Virtualization
Desktop Virtualization executes a virtual machine within an existing operating system environment (Windows, Mac, or Linux). The administrator installs virtualization software, such as VMware workstation or Oracle VirtualBox, and it executes in tandem with other desktop applications. 60 GHz cnWave E2E Controller can then be installed within one of these platforms.
The desktop environment is the easiest way to get 60 GHz cnWave E2E Controller up-and-running quickly. You can download a trial version of VMware workstation.
Bare Metal Hypervisor
A bare metal hypervisor takes over the entire physical machine and uses it to host virtual instances. This type of virtualization is best for production environments, and it takes time to set it up correctly. VMware vSphere ESXi is an example of this type of virtualization, and it is discussed in detail in the appendix. You can download ESXi here.
Downloading and Deploying the OVA procedure
60 GHz cnWave E2E Controller is deployed using VMware workstation player. Directions for VMware vSphere ESXi and VirtualBox procedure are found below. VMware workstation player (and Oracle VirtualBox) tends to be the easiest to install and evaluate, though ESXi is preferred for production.
Downloading OVA
Download the 60 GHz cnWave E2E Controller Virtual Appliance here.
Deploy 60 GHz cnWave E2E Controller OVA on Oracle VirtualBox
The steps to import 60 GHz cnWave E2E Controller into Oracle VirtualBox are below.
-
To install OVA File, open Oracle VirtualBox click File > Import Appliance. Select 60 GHz cnWave E2E Controller OVA file and click Open and Import.
-
Click Agree EULA license agreement.
-
Once the EULA is agreed is accepted, 60 GHz cnWave E2E Controller will be imported into the VirtualBox environment. This process could take few minutes.


Note: If the user plans to have eth1 as the control(device) interface, we recommend to attach the eth1 interface before powering on the VM appliance.
-
Click Start to start the VM Appliance.
-
Login to the 60 GHz cnWave E2E Controller Console.
-
The VM Appliance Console is the only way to access the 60 GHz cnWave E2E Controller CLI (Command Line Interface). Login using the default username/password (cambium/cnwave).


Initializing E2E Controller
To Initialize E2E Controller user needs to configure IPv4 Address and cnMaestro On-Premises server information mandatorily as shown below.
- In the Initialize Controller page, click Configure to assign IPv4 address and cnMaestro On- Premises server.

IPv4 Configuration
-
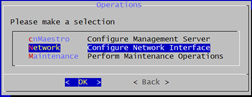
In Menu page click on Network to configure IP Addresses
-
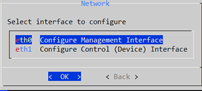
Navigates to the Network page, select eth0 and click OK.


Note:
- User can configure the IPv4 and IPv6 addresses in eth0 and eth1(if attached) interfaces
- eth0: allows the user to configure both the IPv4 to manage the E2E cluster and IPv6 to manage devices if eth1 is not attached
- If eth1 is attached, the 60 GHz cnWave E2E Controller uses the IPv6 address to manage devices only from eth1
-
In the Configure Interface (eth0) page, select IPv4 from the option and click OK.
-
Users can configure Static IPv4 address as shown below in the IPv4 Static IP Configuration.

IPv4 Static IP Configuration
-
Select Static and click OK.
-
In IPv4 Static Configuration (eth0), enter the IP Address/Prefix Length and Default Gateway and click OK.
-
Displays the Notice page IPv4 successfully updated on eth0 and click OK


cnMaestro Management Server Configuration
cnMaestro On-Premises Management allows the user to Configure, Manage, Visualize, and Monitor the network. Follow the below mentioned procedure to manage the network in cnMaestro On-Premises:
Note:
- If the user enables the Cambium ID-based authentication to onboard devices in cnMaestro > Onboard > Claim for devices page, then the user needs to provide the onboarding Key.
- cnMaestro Cloud does not support the 60 GHz cnWave E2E Controller feature currently.
-
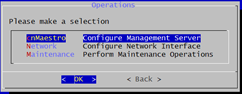
By default, cnMaestro URL will be blank and to update navigate to Operations page > click cnMaestro (In Operations) and change the URL.
-
Provide the URL, Cambium ID, Onboarding Key in the Configure cnMaestro Management Server Page**.**
-
Enter the allowed Log Level value as INFO or Debug and click Update.
-
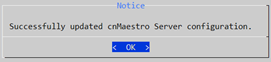
After successful URL updation it pops up Notice page**,** click OK.


Initialize E2E Controller
-
If IPv4 address and cnMaestro Management Information are configured Initialize option will be enabled.
-
eth1 is used as control(device) interface in this guide.
-
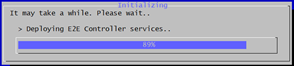
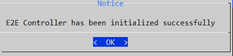
Select Initialize and click Enter. It starts to Initialize the E2E Controller.
-
It displays the Notice as E2E Controller has been initialized successfully and click OK.
-
Navigates to the Information page and displays the Connection Status as Waiting for approval.
-
If connection is successful, user needs to approve the E2E network in cnMaestro UI to make it onboarded.
-
To onboard the network, navigate to the cnMaestro On-Premises > Manage > under System and it displays the new 60 GHz cnWave E2E Controller network and click Approve.
-
After clicking Approve, window pops up 60 GHz cnWave – Network Onboard.
-
In 60 GHz cnWave – Network Onboard popup select Auto-assign to update IPv6 address in E2E Network and wait for a while till IPv6 address gets updated.
-
Enable Layer 2 Bridge (Optional based on the user requirement).
-
Click Apply.
-
Wait for a while till network onboard is successful.


After successfully onboarded, the Network UI shows the Dashboard of the network as shown in below screenshot.

-
During the first time onboarding of E2E Controller, cnMaestro sets prefix allocation as Centralized for the E2E Network Configuration with the default subnet prefix XXX and the subnet prefixes are allocated to all DNs and CNs connecting to this network.
-
Once the network is approved the Information page in the 60 GHz cnWave E2E Controller displays the cnMaestro Management Information > Connection Status as Connected and Assigned IPv6 Address.
-
For Further information on cnMaestro On-Premises Management refer here.

