Introduction
In enterprise Wi-Fi deployments, setting up a large network of many access points (APs) can be labor-intensive and time consuming. An internet-connected office building, warehouse, or factory could require tens to hundreds of individual access points to provide robust connectivity for the whole space. With normal setup procedures, each access point could require a high-speed wired Ethernet connection. This is often not possible or complicated, depending on the requirements of the space.
To solve this problem and facilitate large-scale Wi-Fi deployments, Cambium Networks Enterprise Wi-Fi access points have Zero-Touch Mesh capabilities, enabling multiple access points to work together to relay a Wi-Fi network over large distances, depending on a single base access point connected with a wired Ethernet connection. Every client AP can therefore be activated with only a power source – which is what “zero-touch” refers to, highlighting the simplicity of extending the network. This opens new possibilities for thorough coverage depending on the limitations of the space. Additionally, zero-touch mesh facilitates easy setup using Cambium’s cloud Wi-Fi management platform, cnMaestro. With the initial setup of a mesh base in the cloud, additional APs can be added to the network by simply mapping it to the mesh and powering on the AP. Zero-touch mesh can thus reduce the time it takes to set up and configure large-scale Wi-Fi networks, offering a productivity advantage to get an office, factory, or other space up and running.
This solution paper demonstrates the setup and configuration procedures for Zero-Touch mesh among multiple APs using the cnMaestro cloud platform, and delves into the use cases, troubleshooting, and technical background of this unique technological capability, so that anyone can get the tools and information to set up their own zero-touch mesh on their wireless network.
Zero Touch Mesh on 6.4.x Firmware
There are some features in the 4.x firmware that are not available in the 6.x version.
Please find the list below.
| Feature | Supported in 4.x | Supported in 6.x |
|---|---|---|
| Mesh Auto Detect Backhaul (Base) | ✓ | × |
| Mesh Multi Hop (Base) | ✓ | × |
Additionally, there are parameters that are introduced in 6.x release which is applicable for Zero touch provisioning.
| Parameter | Supported in 4.x | Supported in 6.x |
|---|---|---|
| Mesh Recovery VLAN | × | ✓ |
| Mesh Recovery BAND | × | ✓ |
These parameters will help the mesh client to connect to a recovery SSID based on VLAN and/or BAND configuration
In 6.x firmware, when setting up a Mesh connection, there are a few more things to consider.
-
Mesh client WLAN should be the first profile in the client AP
-
If 6GHz is supported, the mesh client recovery SSID scan sequence will be
6G > 5G > 2.4G; otherwise, 5G > 2.4G.
We are discussing two Topologies here in setting up a zero-touch mesh network.
-
The first topology consists of flat network for Mesh connection as well as station access.
-
In the second topology, multi VLAN deployment is explained, where mesh connection will be on VLAN-X and station access will be on VLAN-Y.
These two deployment models have similarities with most of the commonly used deployments where the difference will be DHCP/GW/NAT configuration for client access and mesh connection will differ.
Flat Topology (single VLAN)
-
Both Mesh as well as station/clients are in same VLAN (VLAN 10)
-
Mesh Base (MB) AP is the DGW(Default Gateway) and DHCP server for VLAN 10

Configuration
-
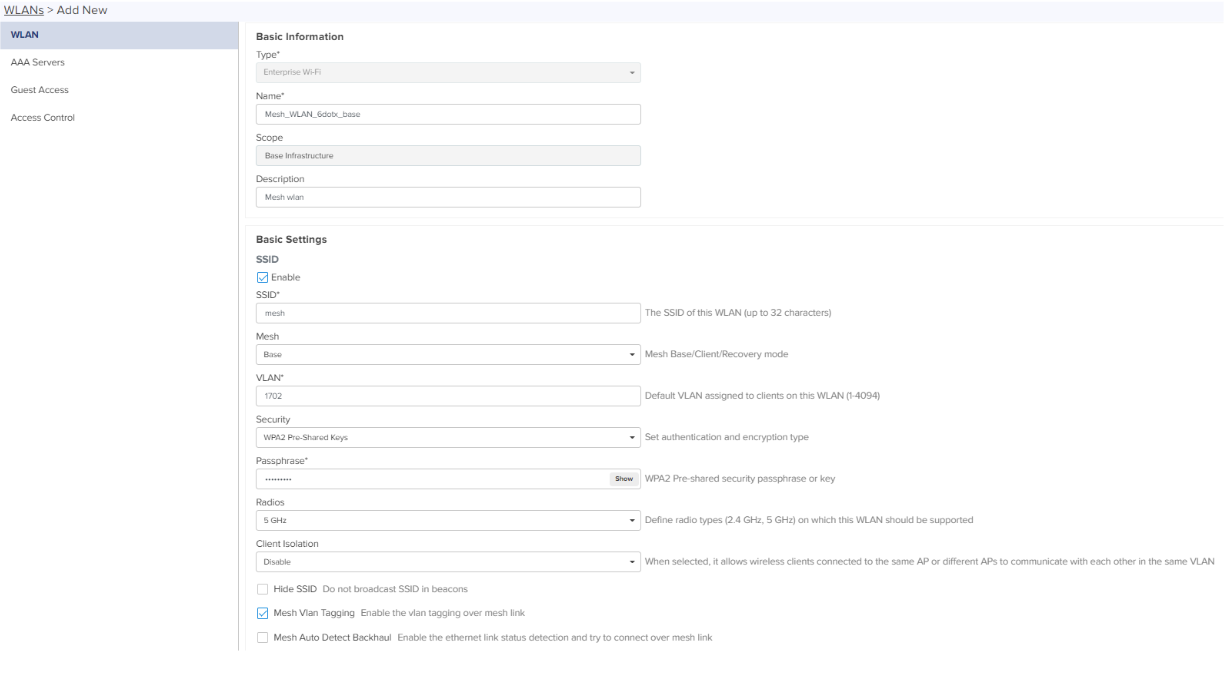
Creating Mesh WLAN for the client AP group
Keep the default values on Advanced Settings
-
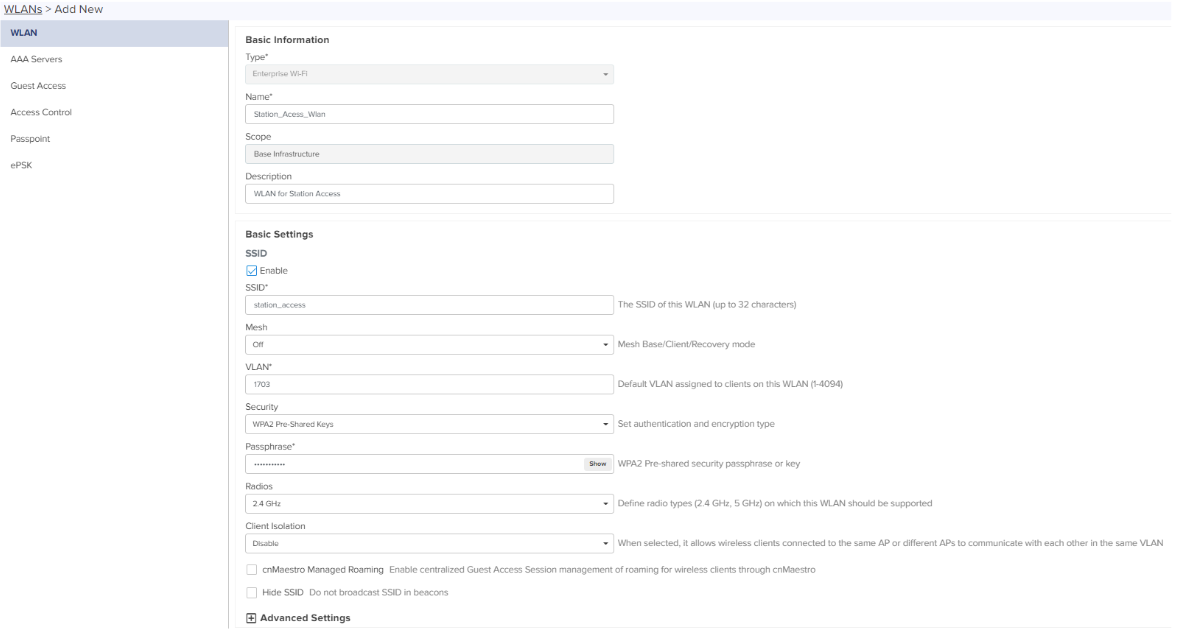
Create Access WLAN, configure other WLAN parameters default
-
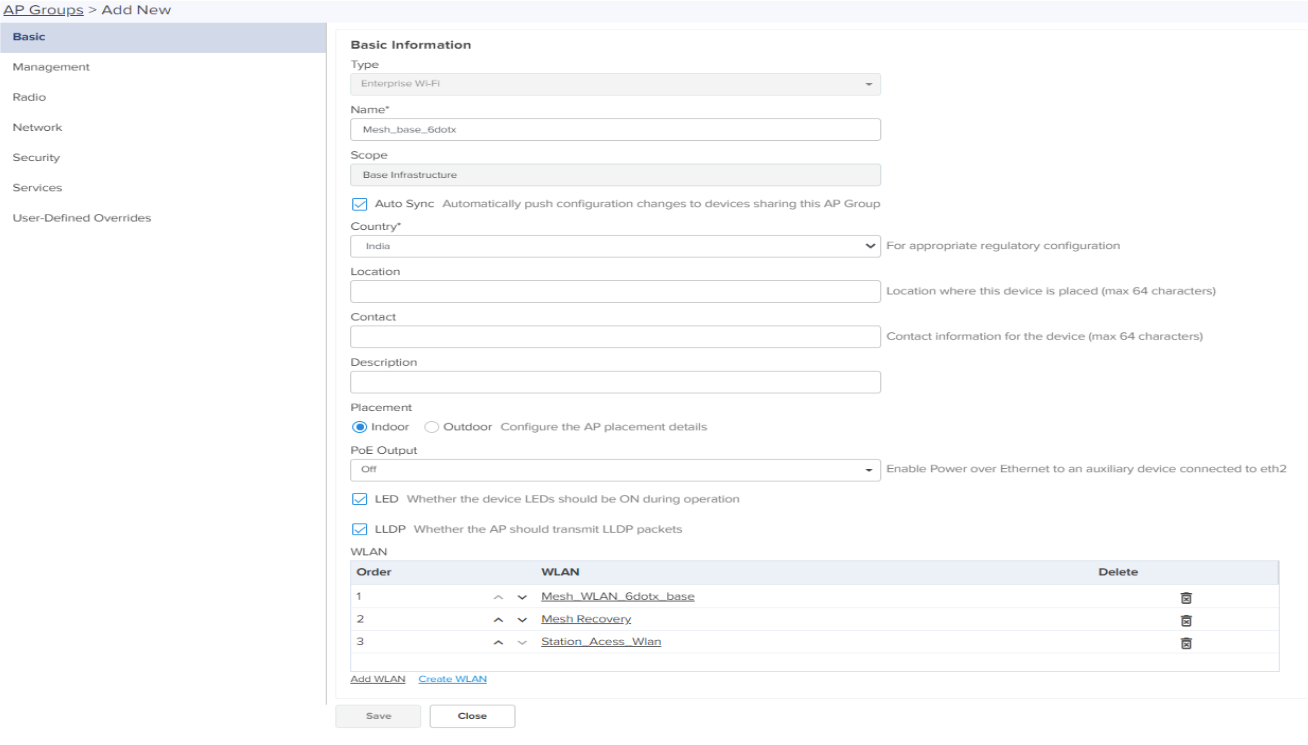
Create a MESH client AP group and attach the two wlan ’s created in the earlier steps to the AP group.
While attaching the WLAN ‘s to the AP groups, add the mesh client wlan at order 1 as shown in the screenshot below, this is a particularly crucial step, since mesh client must be at order 1 for zero touch provisioning to work. This order is essential for the AP to connect to the base in recovery mode and fetch mesh client configuration.
-
Configure country code
-
Set administrative password other than default.
-
Enable both 2.4 GHz and 5 GHz radio (configure 40 MHz channel width for 5 GHz)
-
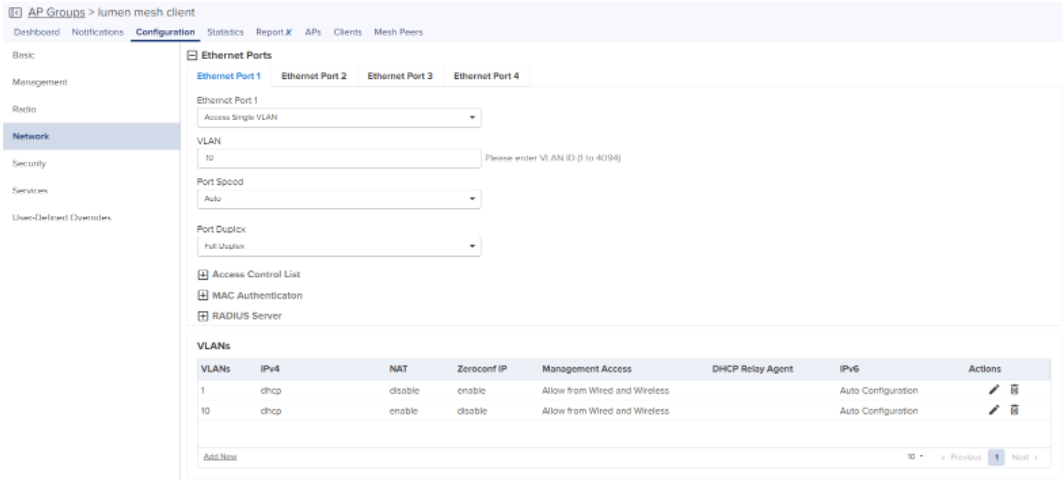
Create VLAN 10 interface on the mesh client AP group (IP address mode DHCP)
-
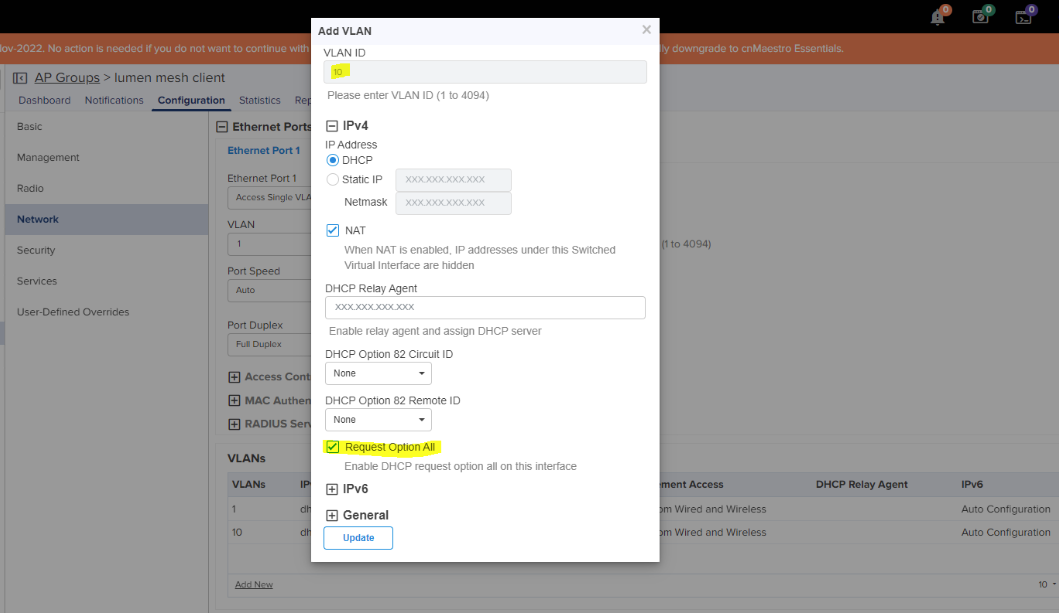
Default Gateway Configuration
Uncheck “Request Option All” from VLAN 1(by default VLAN 1 is the default gateway) and configure VLAN 1702 as the default gateway (by checking “Request Option all”). This configuration will allow mesh link to carry all traffic from the client AP.
-
-
Create Mesh base WLAN for Base AP group
Make certain that, the SSID/VLAN/Passphrase and Radios are same on the BASE and CLIENT WLANs
-
Create mesh recovery WLAN for Base AP group
-
Use the same client/station access WLAN created earlier in the BASE AP group too.
-
Create a MESH base AP group and attach all three wlan ’s (Base /Recovery /Station) created in the earlier steps to the AP group.
-
Configure country code
-
Set administrative password other than default.
-
Enable both 2.4 GHz and 5 GHz radio (configure 40 MHz channel width for 5 GHz)
-
Configure Eth1 port as Access VLAN and configure VLAN 1
-
Configure VLAN 10 and DHCP for VLAN 10 on the AP (IP address mode static)
-
Enable NAT on VLAN 10 (optional)
-
DHCP configuration on Base AP group
-


Onboarding
The onboarding process is the same as it was in 4.x firmware; the difference in 6.4.x firmware is that there are two AP groups, one for Base APs and the other for Client APs; Base APs must be provisioned with the Base AP group, while Client APs must be provisioned with the Client AP group. Both APs will be provided with the correct configuration as a result of this. This separation (of AP groups) will aid in the better management and troubleshooting of the Base and Client APs.
-
Mesh Base AP onboarding
Note that the Base AP is provisioned with the Base AP group profile
-
Mesh Client AP onboarding
Note that the Client AP is provisioned with Client AP group profile


Multi-VLAN topology
-
Both Mesh and station/clients are in different VLAN (VLAN 1702 and VLAN 1703)
-
Router/FW connected to the Mesh Base AP is the DGW and DHCP server for VLAN 1702 and VLAN 1703

Configuration
-
Creating Mesh WLAN for the client AP group
Keep the default values on Advanced Settings
-
Create an access wlan for station/clients to connect
Leave other wlan parameters default.
-
Create a MESH client AP group and attach the two wlan ’s created in the earlier steps to the AP group.
While attaching the wlan ‘s to the AP groups, add the mesh client wlan at order 1 as shown in the screenshot below, this is a particularly crucial step, since mesh client must be at order 1 for zero touch provisioning to work. This order is essential for the AP to connect to the base in recovery mode and fetch mesh client configuration
-
Configure country code
-
Set administrative password other than default.
-
Enable both 2.4 GHz and 5 GHz radio (configure 40 MHz channel width for 5 GHz)
-
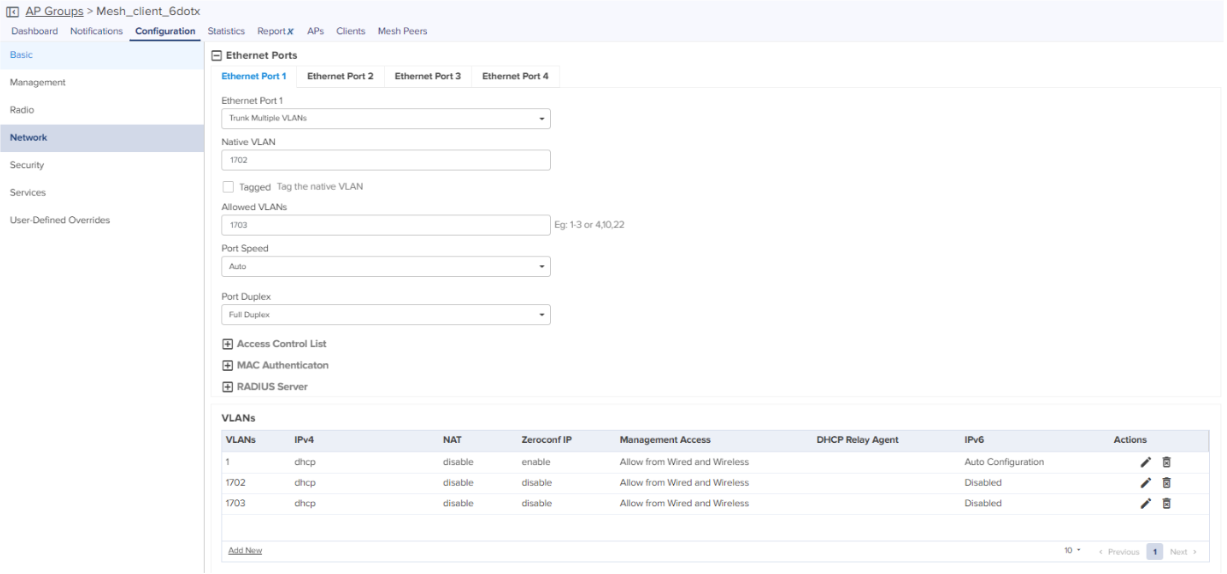
Create VLAN interface for 1702 and 1703 VLAN’s on the mesh client AP group (IP address mode DHCP)
-
Configure 1702 as Native VLAN and 1703 as Trunk allowed VLAN
-
Default Gateway Configuration
Uncheck “Request Option All” from VLAN 1(by default VLAN 1 is the default gateway) and configure VLAN 1702 as the default gateway (by checking “Request Option all”). This configuration will allow mesh link to carry all traffic from the client AP.
-
-
Create Mesh base WLAN for Base AP group
Make certain that the SSID/VLAN/Passphrase and Radios are same on the BASE and CLIENT AP group configuration for base and client AP to scan and connect to each other.
-
Create mesh recovery WLAN for Base AP group
Note: VLAN and Band configuration parameters are available from cnMaestro 3.1.1 version onwards.
-
Use the same client/station access WLAN created earlier in the BASE AP group too.
-
Create a MESH base AP group and attach all three wlan ’s (Base /Recovery /Station) created in the earlier steps to the AP group.
-
Configure country code
-
Set administrative password other than default.
-
Enable both 2.4 GHz and 5 GHz radio (configure 40 MHz channel width for 5 GHz)
-
Configure Eth1 port as Trunk and allowed VLAN 1,1702,1703
-
Configure VLAN’s 1702 and 1703 on the AP (IP address mode DHCP)
-


Onboarding
The onboarding process is the same as it was in 4.x firmware; the difference in 6.4.x firmware is that there are two AP groups, one for Base APs and the other for Client APs; Base APs must be provisioned with the Base AP group, while Client APs must be provisioned with the Client AP group. Both APs will be provided with the correct configuration as a result of this. This separation (of AP groups) will aid in the better management and troubleshooting of the Base and Client APs.
-
Mesh Base AP onboarding
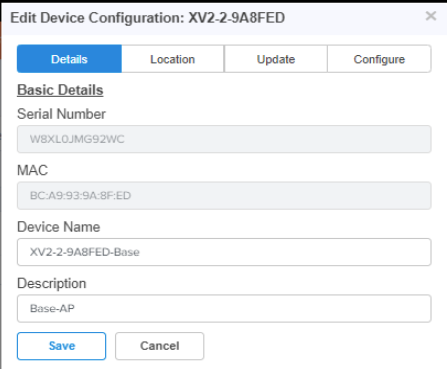
Claim the Base AP in the cnMaestro, once the AP is connected to the internet, it will appear in the cnMaestro onboarding page. (Refer picture below),
Before approving the Base AP, provision AP with below details.
- AP details (Device name and Description)
- Location (Network and Site information)
- AP group profile (Base AP group name)
- Once all the details are inputted, approve the AP.
-
Mesh Client AP onboarding
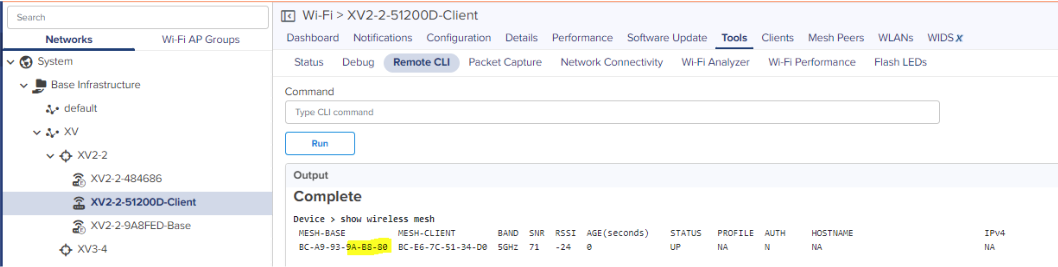
Connect the factory reset client AP to the power source, once the AP gets the power, AP will connect to the recovery SSID and reach the cnMaestro (refer screenshot below)
onboard the client AP and configure device parameters and client AP group profile.
Once the client AP is provisioned with client AP group profile, cnMaestro will push the configuration and client AP will make a connection to the Base AP and show up in the cnMaestro.


Zero Touch Mesh on 4.x Firmware
Configuration
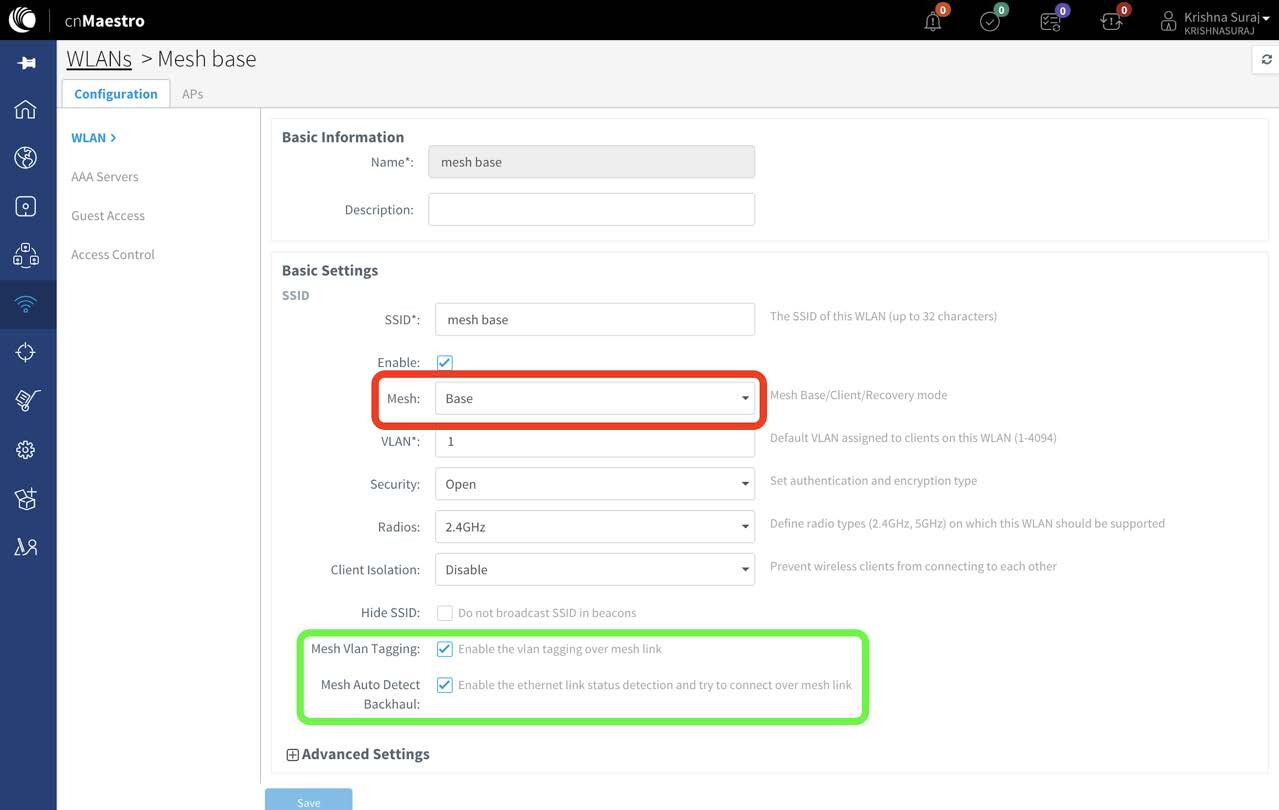
Setting up a zero-touch mesh network starts with creating three WLANs, each configured to certain specifications to facilitate the adoption of new APs into the network. First, for mesh base, ensure that the “Mesh” field is set to “Base” (highlighted in red, below). Additionally, check the two boxes highlighted in green to enable a mesh base connection transfer from mesh base to mesh client when it loses wired connectivity. This is important in case of failure of backhaul and it changes the role and connects to another mesh Base.
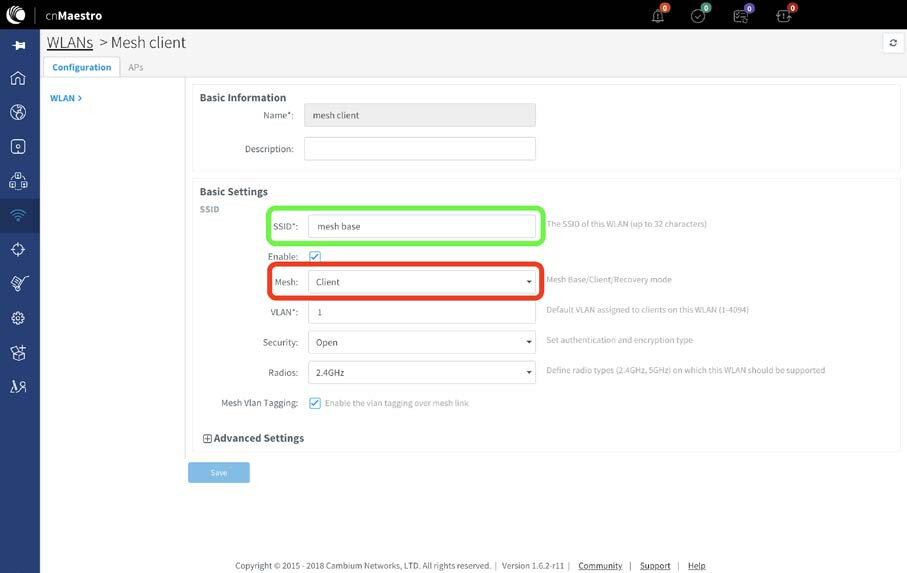
Next for the mesh client, select “Client” under the “Mesh” tab and ensure that the SSID is identical to the SSID for the mesh base (below). This is essential for the mesh base and mesh client to get connected on the same SSID in zero-touch mesh network.
Finally, for the recovery profile, simply select “Recovery” under the “Mesh” menu (below).

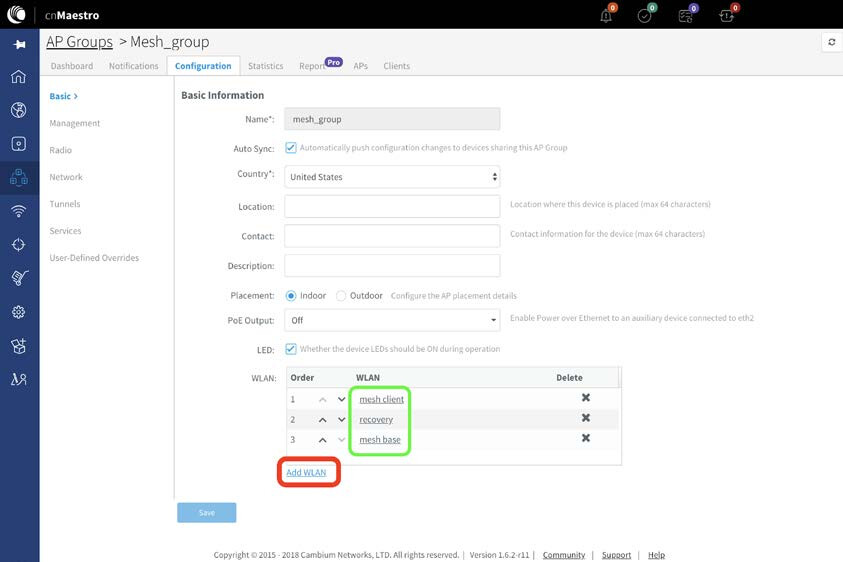
Next, we create an AP group profile in cnMaestro to organize the various WLANs, APs, and configuration settings for the entire zero-touch mesh network. First, navigate to the “AP Groups” tab in cnMaestro (highlighted in green) and create a new AP group (highlighted in red).

Now, we must add the three recently configured WLANs to the AP group and ensure that they are configured correctly. As we configured above, these three unique WLANs are: the mesh base, to which the initial wired AP maps, the mesh client, representing subsequent AP mapping points, and a recovery SSID, representing the initial connection for additional APs before they are adopted to the mesh client. Notice the order of the WLANs (Figure 1.): mesh client must come first in order due to technical protocols with the driver: this results in mesh client being the default WLAN for additional meshed APs, as intended.
Onboarding
Now that the AP group and WLAN settings have been configured, we must add and connect the mesh base access point. Navigate to the “APs” tab in the “AP Groups” menu and select “Claim New AP” (highlighted in red below). First, add the serial number of the base AP. Connect the first AP to a power source and wired internet connection and onboard it onto cnMaestro. Since it has been added to the mesh AP group, it would be adopted to the mesh base WLAN automatically. From here, it will act as the wired connection point from which to mesh other added APs to the network.

To add additional access points, again click “Claim New AP” and input the serial number to map the device to the mesh AP group. Only connect the AP to a power source (not a wired Ethernet connection). From here, it will automatically adopt to the recovery WLAN. From there, it will be transferred to the mesh client network to act as a relay for the mesh base. Multiple APs can be added using this method.
Troubleshooting
If client APs cannot be adopted to the network or display an “offline” state, several fixes exist. First, ensure that the AP software is updated to the most recent version, to ensure compatibility and correct mesh functioning. Secondly, a factory reset on the AP box itself could serve to wipe old configurations from the box and leave it free to adopt to a newly created mesh network, if it hadn’t been able to do so before.
