Summary:
This article demonstrates how to configure the VLANs on CMM4 Ether WAN switch that is running with latest version v1.93.
Solution:
There are basically two types of VLANs that are briefly explained below:
VLAN Port Based VLAN vs Tagged Based VLAN.
The Ether WAN Managed Switch can be configured to operate in one of two VLAN modes:
- Port based VLAN mode or
- Tagged based VLAN mode.
In Port based VLAN mode, packets from different VLANs can only be segregated from one another while within a single switch, but not when the packets travel to other switches in the network. The VLAN association rule for all incoming packets in Port based VLAN mode is determined only by the VLAN ID that is associated with the port when a packet enters the switch.
In Tagged based VLAN mode, traffic from different VLANs can be segregated from one another even after it travels to another switch. This is done by “tagging” (inserting information inside a packet) a packet with the VLAN ID that the packet belongs to, when the packet exits the switch. The VLAN association rule for incoming packets in Tag based VLAN mode can either be based on the VLAN ID that is assigned to the port (PVID) when a packet enters the switch (in the event when the packet does not contain a VLAN ID), or it can be determined from the packet itself (when the packet does contains a VLAN ID).
Configuring VLANs in Port Based VLAN Mode
Enabling Port Based VLAN to navigate to the VLAN Mode Setting page:
- Click on the + next to VLAN.
- Click on VLAN Mode Setting.
To enable Port Based VLAN on the switch:
- Select Port-based VLAN from the dropdown box (see below)
- Click on the Submit button.
- Save the configuration.

Port Based VLAN Configuration Examples
To navigate to the Port Based VLAN page:
- Click on the + next to VLAN.
- Click on Port Based VLAN.
In Port Based VLAN mode, you can configure a port to be a member of a single VLAN or multiple VLANs. By default, all the ports on the switch are all members of a single VLAN (VLAN 1).
EXAMPLE-1 PORT BASED VLAN CONFIGURATION
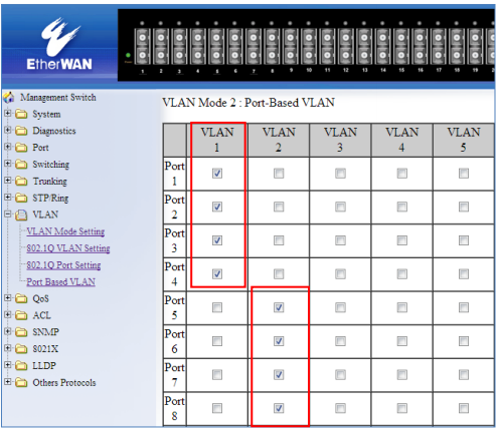
Below is an example that shows how to configure two groups of ports, with each port being a member of a single VLAN. As no ports are members of more than one VLAN, the ports in different groups cannot communicate with each other.

EXAMPLE-2 PORT BASED VLAN CONFIGURATION
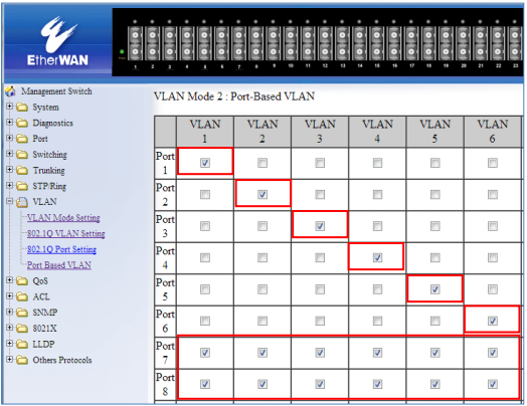
In the example shown in figure, ports 1 through 6 are all on their own VLAN and cannot communicate with each other. Port 7 and 8 are members of all 6 VLANS and therefore can communicate with all ports that are in any of the VLANs that they share membership with.

VLAN Configuration in 802.1Q Tag Based VLAN Mode
802.1Q VLAN configuration consists of the following four elements:
- Creating all VLANs in the VLAN database.
- Configuring an incoming untagged packet’s VLAN association rule: this is accomplished by configuring the PVID setting on each individual port.
- Configuring the ports that are associated with a VLAN to allow the packets that belong to that VLAN to exit and enter the switch through that port.
- Configuring the tag action on the outgoing packets for each VLAN, that is to say, deciding on whether or not an outgoing packet will be tagged with the VLAN number that the packet belongs to.
Ether WAN configuration with different Port Types
All ports on the Ether WAN Managed Switch can be configured with different Port Types that have different tagging restrictions as defined below.
- Access Port - If a port is configured to be an Access Port, this port can only be a member of a single VLAN based on the Access Port’s PVID VLAN setting, and this port’s outgoing packets cannot be modified to contain a VLAN Tag.
- Trunk Port - If a port is configured to be a Trunk Port, this port can be a member of multiple VLANs. This port’s outgoing packets will be automatically modified to contain a VLAN tag of the VLAN that the packet belongs to, with the exception of the PVID VLAN on that port. The PVID VLAN on a Trunk Port will not be automatically modified to contain a VLAN tag of the PVID VLAN.
- Hybrid Port - A Hybrid Port has no restrictions on it. If a port is configured to be a Hybrid Port, this port can be a member of multiple VLANs, and the port’s outgoing packets can be configured to be either with or without a VLAN tag of the VLAN that the packet belongs to, including the PVID VLAN of the Hybrid
NOTE: For all three types of ports above, if an incoming packet contains a VLAN tag, the packet’s VLAN association rule will be based on the VLAN Tag.
Enabling 802.1Q Tagged Based VLAN
To navigate to the VLAN Mode Setting page:
- Click on the + next to VLAN.
- Click on VLAN Mode Setting.
To enable 802.1Q Tagged Based VLAN on the switch:
- Select Tag-based VLAN from the dropdown box (see below)
- Click on the Submit button.
- Save the configuration

Configuring 802.1Q VLAN Database
To navigate to the 802.1Q VLAN Setting page:
- Click on the + next to VLAN.
- Click on 802.1Q VLAN Setting.
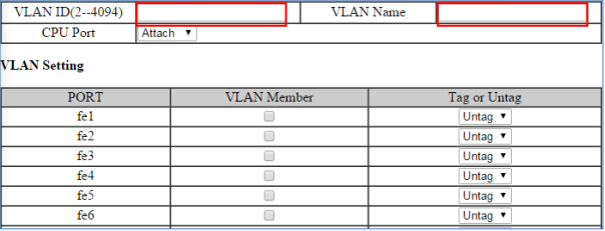
To configure the 802.1Q VLAN Database, please do the following:
- Click on the Add VLAN button
- Enter the VLAN ID.
- Enter the VLAN Name.
- Select Attach or Detach for the CPU Port. Attaching the CPU to a VLAN is typically done on the Management VLAN.
- Select the ports to be a member of the VLAN
- Click on Submit button.
- Repeat for all the VLANs that are needed.
- Save the configuration.


How to Add an IP to the Management VLAN
To navigate to the System/IP Address page:
- Click on the + next to System.
- Click on IP Address.
To add an IP for a Management VLAN:
- Enter the IP address and subnet mask for the management VLAN
- Click on the Submit button
- Save the configuration.

How to Delete an IP to the Management VLAN
To delete an IP from a VLAN (the default VLAN, for an example):
- Delete the IP and the subnet mask of the default VLAN and leave it as blank
- Click on the Submit button.
Warning: Before completing the steps above, ensure that you have already set up another management IP on another VLAN, and have set up a port properly for accessing that VLAN.