Howto: ePMP routed network with Juniper/Mikrotik/OSPF/freeradius/VLAN management

Okay, with a huge thanks to @Douglas_Generous and a few others I’m building a howto to use commodity hardware to build a routed ISP network with radius authentication (freeradius/daloradius) with a web gui that puts users in a mysql (mariadb) database where you can manage them, and authenticate out to the clients through a PPPoE authentication which is proxied through a per tower Mikrotik across an OSPF area, which is resilient to path changes. This is based on a thread here.

The ePMP AP’s and client subs have their own separate routed VLAN’s used for management so they are transparent to customers.

The clients are put on a per-tower CGNAT subnet (100.64.x.x/24) so their home router WAN’s think they’re on public static.

You will 100% have to change the subnets to make yours work, but hopefully this will get you started.

I fully realize there are many ways to do this and this is just one, but it is an end-to-end routed network you can (or not) use to inform your ePMP network design. Your mileage may vary, etc., etc. etc. If you have suggestions for changes let me know, besides rude suggestions on why you built your network with NASA grade hardware and refuse to use commodity stuff. Feel free to spend more on hardware if you want. I’ll try to update this if people feel it’s useful. You’re also free to ignore it, but hopefully it helps someone else.

I’ll start with a network diagram to show you what I’ve built on the bench:

I’ll include the command line configurations for the Juniper, Mikrotik, Debian freeradius (Raspberry Pi for test), ePMP radios and the customer router to completely duplicate this network.

All this will take some time, so bear with me.

4 Likes

First, the Juniper. I’m using an old SRX-240 router/firewall I had sitting around. It’s running JunOS, which is Juniper’s version of the routing world. You could use Cisco, Mikrotik, Brocade or whatever, but this configuration works and it’s running the core routing for this test network. Since command line is easier to manage with Juniper, I’ll give you the config and you can just cut/paste it into CLI and it should start routing once you commit the code (that’s Juniper for “save”). First, get a console connection and login. You probably should save and then delete whatever configuration you have on it first, you might need it later. Ask me how I know :slight_smile:

login: root
password: whatever you use
routername% cli
root@routername> config
Entering configuration mode

[edit]

Now you can cut/paste the following into the terminal. It will give you a lot of gobbleygook messages, but eventually you’ll get a command prompt back, then hit enter. I’ll assume you already set up your login credentials, if not do so or you won’t be logging in after you delete the config.

set system host-name ospftest1
set system name-server 208.67.222.222
set system name-server 208.67.220.220
set system services ssh
set system services dhcp pool 192.168.20.0/24 address-range low 192.168.20.100
set system services dhcp pool 192.168.20.0/24 address-range high 192.168.20.200
set system services dhcp pool 192.168.20.0/24 name-server 1.1.1.1
set system services dhcp pool 192.168.20.0/24 router 192.168.20.1
set system syslog archive size 100k
set system syslog archive files 3
set system syslog user * any emergency
set system syslog file messages any critical
set system syslog file messages authorization info
set system syslog file interactive-commands interactive-commands error
set system max-configurations-on-flash 5
set system max-configuration-rollbacks 5
set interfaces ge-0/0/0 unit 0 family inet address up.stream.static.ip/24
set interfaces ge-0/0/1 unit 0 family inet address 192.168.30.1/24
set interfaces ge-0/0/2 unit 0 family inet address 10.30.10.1/24
set interfaces ge-0/0/3 unit 0 family inet address 192.168.20.1/24
set routing-options static route 0.0.0.0/0 next-hop 192.168.32.1
set routing-options static route 10.1.100.0/24 next-hop 192.168.30.2
set protocols ospf export REDISTRIBUTE_ALL_STATIC
set protocols ospf export ospf-default
set protocols ospf area 1.1.1.1 interface ge-0/0/1.0
set protocols stp
set policy-options policy-statement REDISTRIBUTE_ALL_STATIC term 1 from protocol direct
set policy-options policy-statement REDISTRIBUTE_ALL_STATIC term 1 then accept
set policy-options policy-statement ospf-default from protocol static
set policy-options policy-statement ospf-default from route-filter 0.0.0.0/0 exact
set policy-options policy-statement ospf-default then accept
set security address-book radius1 address radius2 range-address 10.30.10.2 to 10.30.10.5
set security address-book radius1 attach zone mgmt
set security screen ids-option untrust-screen icmp ping-death
set security screen ids-option untrust-screen ip source-route-option
set security screen ids-option untrust-screen ip tear-drop
set security screen ids-option untrust-screen tcp syn-flood alarm-threshold 1024
set security screen ids-option untrust-screen tcp syn-flood attack-threshold 200
set security screen ids-option untrust-screen tcp syn-flood source-threshold 1024
set security screen ids-option untrust-screen tcp syn-flood destination-threshold 2048
set security screen ids-option untrust-screen tcp syn-flood timeout 20
set security screen ids-option untrust-screen tcp land
set security nat source rule-set mgmt-internet from zone mgmt
set security nat source rule-set mgmt-internet to zone untrust
set security nat source rule-set mgmt-internet rule mgmt-internet match source-address 0.0.0.0/0
set security nat source rule-set mgmt-internet rule mgmt-internet then source-nat interface
set security nat source rule-set tower1-internet from zone tower1
set security nat source rule-set tower1-internet to zone untrust
set security nat source rule-set tower1-internet rule tower1-internet match source-address 0.0.0.0/0
set security nat source rule-set tower1-internet rule tower1-internet then source-nat interface
set security nat source rule-set test-internet from zone test
set security nat source rule-set test-internet to zone untrust
set security nat source rule-set test-internet rule test-internet match source-address 0.0.0.0/0
set security nat source rule-set test-internet rule test-internet then source-nat interface
set security policies from-zone mgmt to-zone untrust policy mgmt-untrust match source-address any
set security policies from-zone mgmt to-zone untrust policy mgmt-untrust match destination-address any
set security policies from-zone mgmt to-zone untrust policy mgmt-untrust match application any
set security policies from-zone mgmt to-zone untrust policy mgmt-untrust then permit
set security policies from-zone tower1 to-zone untrust policy tower1-untrust match source-address any
set security policies from-zone tower1 to-zone untrust policy tower1-untrust match destination-address any
set security policies from-zone tower1 to-zone untrust policy tower1-untrust match application any
set security policies from-zone tower1 to-zone untrust policy tower1-untrust then permit
set security policies from-zone test to-zone untrust policy test-internet match source-address any
set security policies from-zone test to-zone untrust policy test-internet match destination-address any
set security policies from-zone test to-zone untrust policy test-internet match application any
set security policies from-zone test to-zone untrust policy test-internet then permit
set security policies from-zone test to-zone tower1 policy test-tower1 match source-address any
set security policies from-zone test to-zone tower1 policy test-tower1 match destination-address any
set security policies from-zone test to-zone tower1 policy test-tower1 match application any
set security policies from-zone test to-zone tower1 policy test-tower1 then permit
set security policies from-zone test to-zone mgmt policy test-mgmt match source-address any
set security policies from-zone test to-zone mgmt policy test-mgmt match destination-address any
set security policies from-zone test to-zone mgmt policy test-mgmt match application any
set security policies from-zone test to-zone mgmt policy test-mgmt then permit
set security policies from-zone tower1 to-zone mgmt policy radius match source-address any
set security policies from-zone tower1 to-zone mgmt policy radius match destination-address radius2
set security policies from-zone tower1 to-zone mgmt policy radius match application any
set security policies from-zone tower1 to-zone mgmt policy radius then permit
set security policies from-zone mgmt to-zone tower1 policy mgmt1 match source-address any
set security policies from-zone mgmt to-zone tower1 policy mgmt1 match destination-address any
set security policies from-zone mgmt to-zone tower1 policy mgmt1 match application any
set security policies from-zone mgmt to-zone tower1 policy mgmt1 then permit
set security zones security-zone untrust screen untrust-screen
set security zones security-zone untrust interfaces ge-0/0/0.0 host-inbound-traffic system-services ping
set security zones security-zone mgmt host-inbound-traffic system-services all
set security zones security-zone mgmt host-inbound-traffic protocols all
set security zones security-zone mgmt interfaces ge-0/0/2.0
set security zones security-zone tower1 host-inbound-traffic system-services ping
set security zones security-zone tower1 host-inbound-traffic protocols all
set security zones security-zone tower1 interfaces ge-0/0/1.0
set security zones security-zone test host-inbound-traffic system-services all
set security zones security-zone test host-inbound-traffic protocols all
set security zones security-zone test interfaces ge-0/0/3.0

Now you have to commit the code and then exit. You can check your config for errors before saving by doing:

root@ospftest1# commit check 
configuration check succeeds

[edit]

If you have errors you have to stop and fix them or it won’t work. If you have none you can do:

root@ospftest1# commit and-quit
root@ospftest1>
3 Likes

Here’s the Mikrotik configuration. I used an old 750UP I had sitting around. I don’t really grok Mikrotik’s world very well, so definitely needed some help to get this working. Here’s what I have. It works. I can’t say much more about it, so chime in if it’s “underinspired” :slight_smile:

I’m hooking up the backhaul port as ether5 and the port pointing to the wireless AP and customers on ether3.

The OSPF (Open Shortest Path First) creates a kind of “network on top of the network” that connects to the Juniper and then shares routes, subnets and traffic. This also means if you hook up multiple paths to the tower later, it will “heal” if one of the paths goes down. You can read about this until you fall asleep if you like, but this implements it. Once you plug this Mikrotik into the same network as the Juniper, it takes a couple minutes, then it just “sees” the OSPF area1 and its related networks. It’s hard to understand at first.

[admin@MikroTik] > /exp
# apr/13/2022 16:37:57 by RouterOS 6.48.6
#
# model = RouterBOARD 750UP r2
/interface ethernet
set [ find default-name=ether1 ] advertise=10M-half,10M-full,100M-half,100M-full,1000M-half,1000M-full
set [ find default-name=ether2 ] advertise=10M-half,10M-full,100M-half,100M-full,1000M-half,1000M-full \
    name=ether2-master
set [ find default-name=ether3 ] advertise=10M-half,10M-full,100M-half,100M-full,1000M-half,1000M-full
set [ find default-name=ether4 ] advertise=10M-half,10M-full,100M-half,100M-full,1000M-half,1000M-full
set [ find default-name=ether5 ] advertise=10M-half,10M-full,100M-half,100M-full,1000M-half,1000M-full
/interface vlan
add interface=ether3 name=mgmt vlan-id=98
/interface list
add exclude=dynamic name=discover
add name=mactel
add name=mac-winbox
/interface wireless security-profiles
set [ find default=yes ] supplicant-identity=MikroTik
/ip pool
add name=testpool ranges=100.64.30.0/24
/ppp profile
set *0 dns-server=8.8.8.8 local-address=1.2.3.4
set *FFFFFFFE dns-server=8.8.8.8 local-address=1.2.3.4
/routing ospf area
add area-id=1.1.1.1 name=area1
/routing ospf instance
set [ find default=yes ] redistribute-connected=as-type-1
/snmp community
set [ find default=yes ] addresses=0.0.0.0/0
/ip neighbor discovery-settings
set discover-interface-list=discover
/interface list member
add list=discover
add interface=ether3 list=discover
add interface=ether4 list=discover
add interface=ether5 list=discover
add list=mactel
add list=mac-winbox
/interface pppoe-server server
add authentication=pap disabled=no interface=ether3 mrru=1500
/ip address
add address=192.168.30.2/24 interface=ether5 network=192.168.30.0
add address=10.1.100.4/24 interface=mgmt network=10.1.100.0
/ip dhcp-client
add comment=defconf disabled=no interface=ether1
/ip dns
set allow-remote-requests=yes servers=8.8.8.8
/ip dns static
add address=192.168.88.1 name=router
/ip firewall filter
add action=accept chain=input comment="defconf: accept ICMP" disabled=yes protocol=icmp
add action=accept chain=input comment="defconf: accept established,related" connection-state=\
    established,related disabled=yes
add action=drop chain=input comment="defconf: drop all from WAN" disabled=yes in-interface=ether1
add action=fasttrack-connection chain=forward comment="defconf: fasttrack" connection-state=\
    established,related disabled=yes
add action=accept chain=forward comment="defconf: accept established,related" connection-state=\
    established,related disabled=yes
add action=drop chain=forward comment="defconf: drop invalid" connection-state=invalid disabled=yes
add action=drop chain=forward comment="defconf:  drop all from WAN not DSTNATed" connection-nat-state=\
    !dstnat connection-state=new disabled=yes in-interface=ether1
/ip firewall nat
add action=masquerade chain=srcnat comment="defconf: masquerade" out-interface=ether1
/ip smb shares
set [ find default=yes ] directory=/pub
/ppp aaa
set interim-update=1m use-circuit-id-in-nas-port-id=yes use-radius=yes
/ppp secret
add disabled=yes local-address=1.2.3.4 name=1 password=1 remote-address=100.64.30.1
/radius
add address=10.30.10.5 secret=somepassword service=ppp src-address=192.168.30.2 timeout=3s
/radius incoming
set accept=yes
/routing ospf network
add area=area1 network=192.168.30.0/24
/system clock
set time-zone-name=America/Los_Angeles
/system logging
add disabled=yes topics=radius
/system package update
set channel=long-term
/tool mac-server
set allowed-interface-list=mactel
/tool mac-server mac-winbox
set allowed-interface-list=mac-winbox
[admin@MikroTik] > 

3 Likes

This looks great. I am looking forward to seeing the radius setup.

Just a couple of notes from an experience standpoint when transitioning this to production:

If you can limit the BH connection to 1 managed interface (or VLAN) per link, Point-to-Point mode in OSPF is a better option IMHO. It generally has a faster discovery and recovery time because the router knows it’s only going to 1 other router, and generally on the same (small) IP scope as itself.

As an example, in our network, we have managed switches in front of our routers to provide port density and fiber connections when needed. We give each backhaul link its own VLAN for data, and configure the switch ports as access or hybrid trunks so that data passes the backhauls untagged, but you can keep the management tagged for “single port out of band” access. Then on the remote side, the process is reversed in that switch and back to the router. Separating the data traffic between routers to 1 VLAN (or 1 interface if connected directly to the router) allows you to set up OSPF point-to-point links to take advantage of the optimized protocol.

Secondly, if you do decide to run point-to-point OSPF links, the Juniper and the Mikrotik have to be on the same size subnet. The Juniper is a little pickier about this than Mikrotiks. We normally use /31 subnets in Mikrotiks as our point-to-point IPs, but Mikrotik advertises it as a /32 through OSPF to the Juniper, and the Juniper would see that it wasn’t a “true” /31 and reject the connection. We ended up migrating any OSPF links connecting to the Juniper to /30s to get around this little gotcha, but it took a bit to find the cause of the issue.

2 Likes

Thanks for the feedback.

It’s worth noting that this howto will have to be changed to suit your environment first (for it to work at all) like subnets, etc., but also this is just a starting point.

I hope to integrate some of the feedback (after I get the initial config posted), but just understand that after you deploy your network you’ll still need to “tune” it over time based on what you learn: This isn’t just a fire-and-forget. This config is the intersection for a non-trivial number of technologies, so this duct tape howto will hopefully get you started on your way with a working network you can modify as you go.

On the next post I’ll do the freeradius/daloradius implementation. It’s not perfect either.

2 Likes

Ok, so you have your core router, your tower router, next is the freeradius server that sits behind your core router and authenticates customers, sets their bandwidth, gives you a way to turn customers on and off with a web interface, which is nice. It stores the customer data in a mariadb/mysql database, so it’s easy to use for other things later. On this server I’m using open source, so all this stuff is free to download and use. You may extend functionality with paid stuff later, probably will, but this will work.

Freeradius does a thing called AAA (Authentication, Authorization and Accounting). It’s designed to figure out who’s trying to connect, what bandwidth they should have, and if they’ve paid their bill. Freeradius is often the hook where commercial billing systems connect to your customers, so if you tell them you have freeradius they’ll (hopefully) be happy with you and they can take it from there.

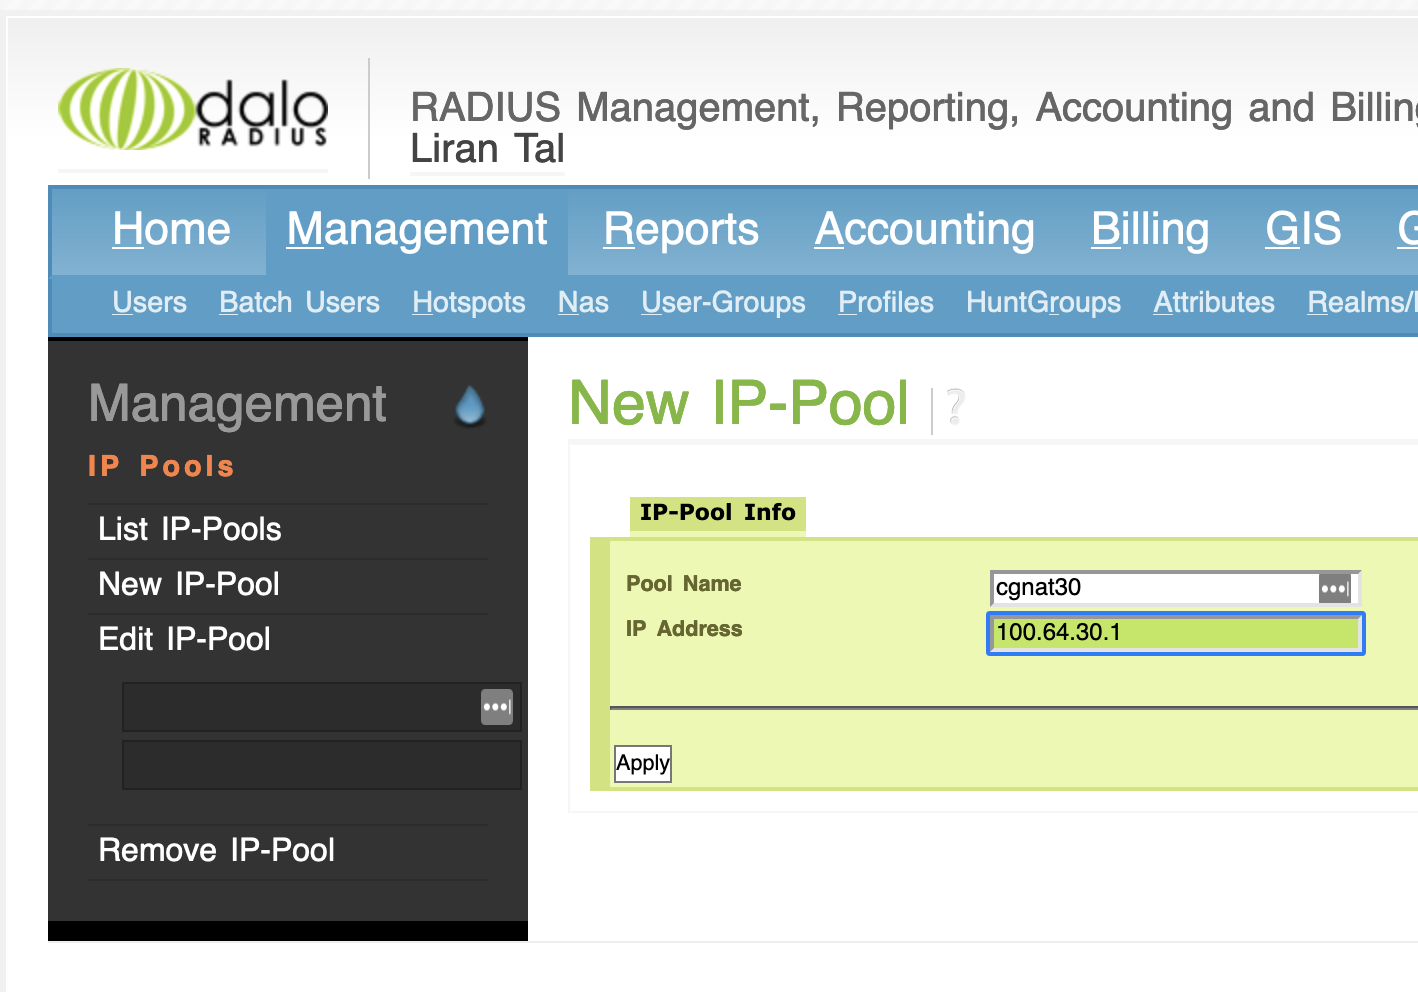
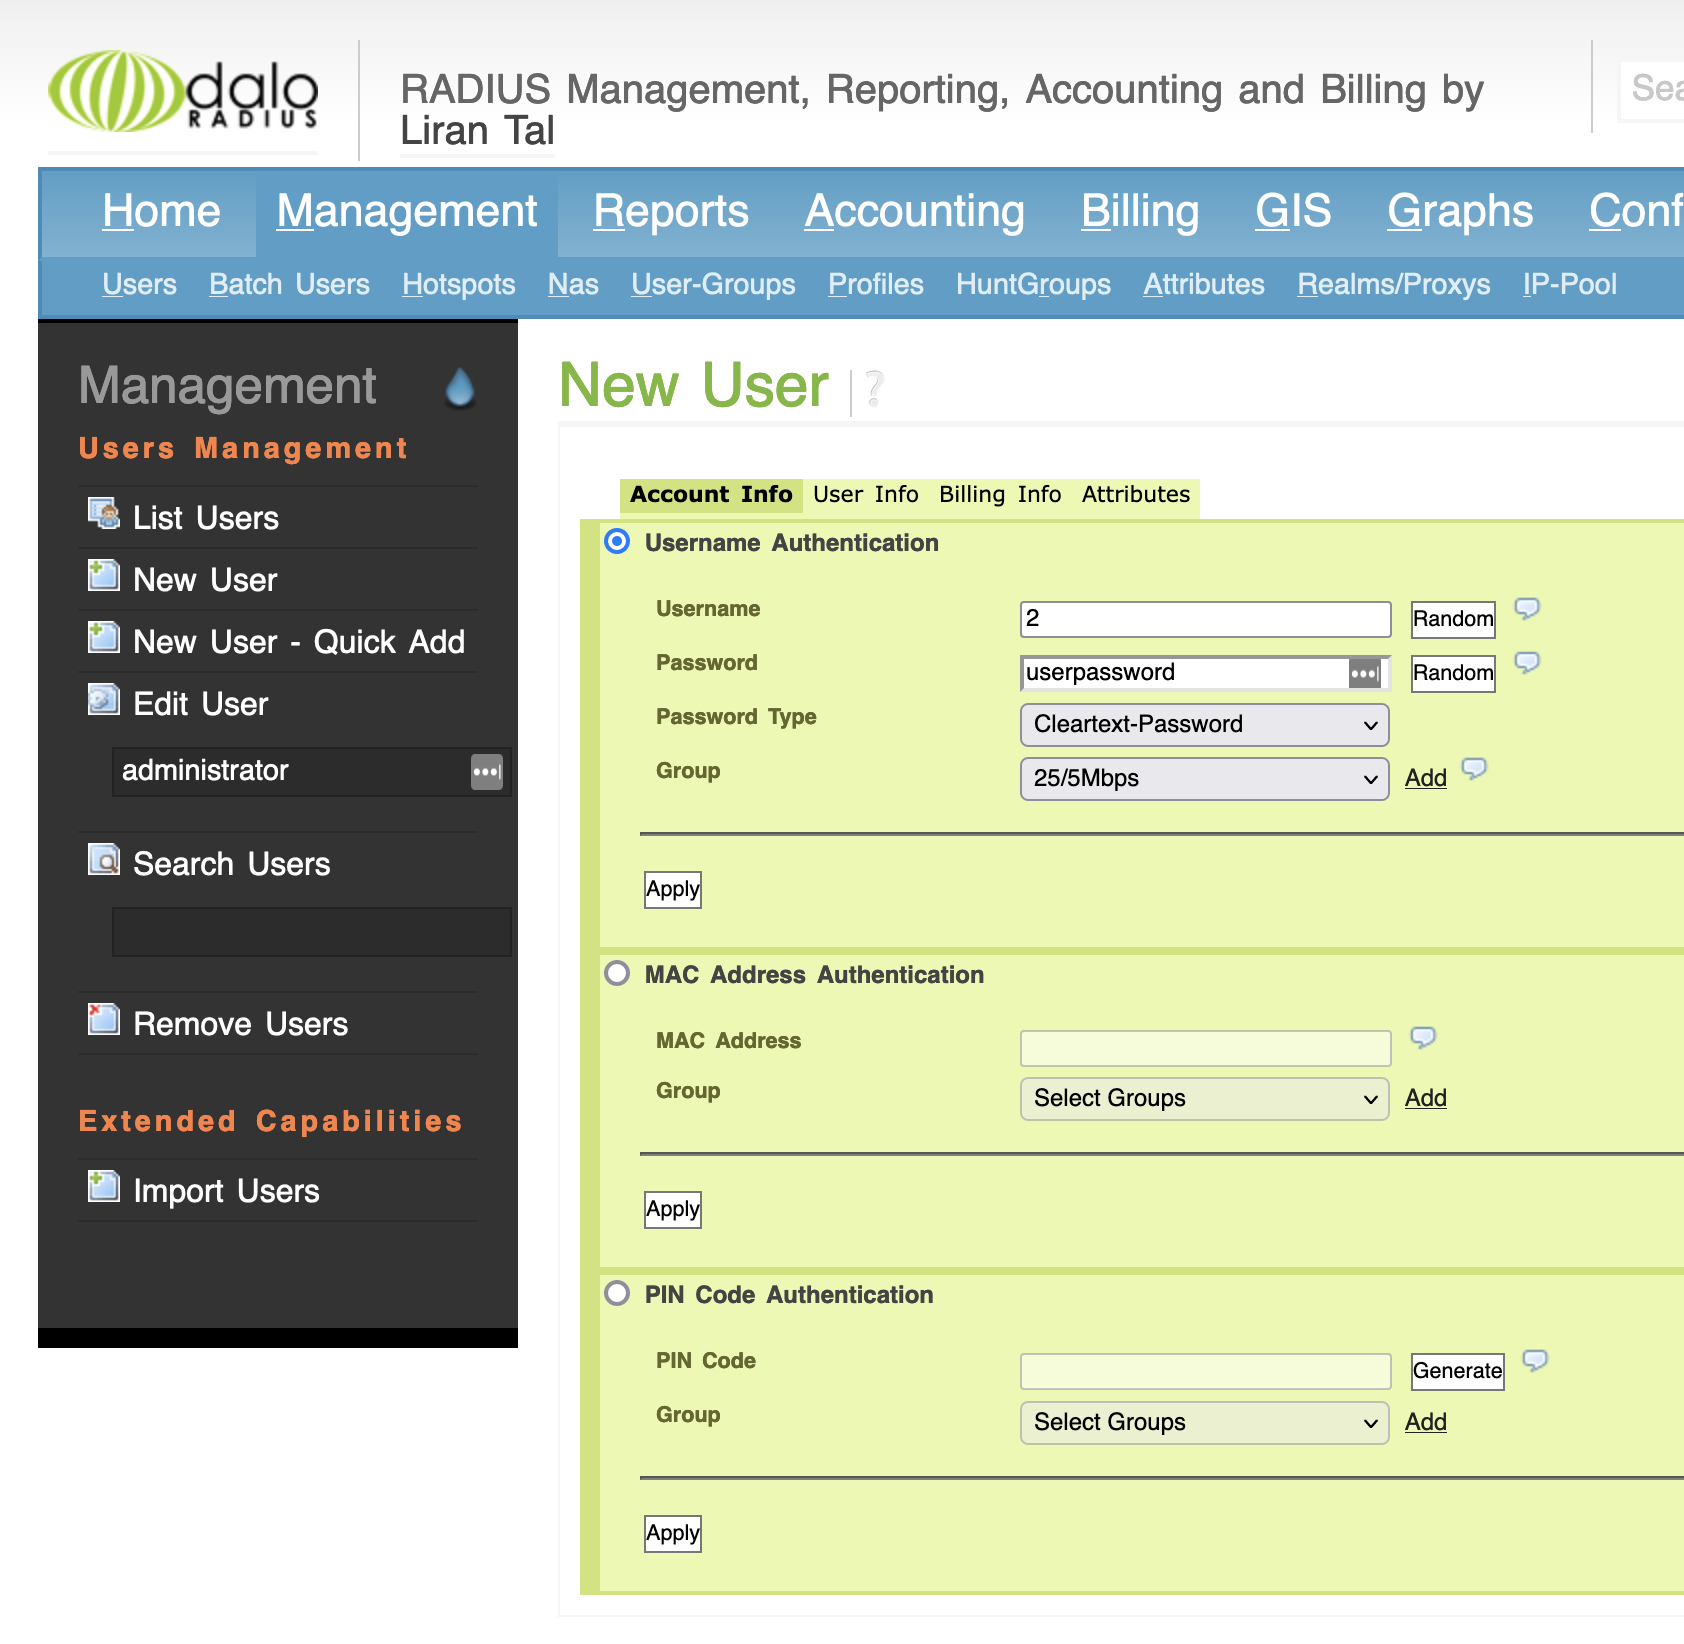
Daloradius is a glitchy but lovely web interface for freeradius that gives you pretty pictures of what’s happening. It also has billing functionality if you want to use it. But it has a very distinctively Github code feel to it, meaning it was written to solve a particular problem a particular way you might not love. But there’s decent developer support, so hopefully it will endure and get bug fixes. No guarantees.

First, I created a Debian Buster server on a Raspberry Pi. This is a development environment where I can test. But after testing, if you use Debian/freeradius/daloradius/mariadb for this, it’s relatively easy to port this to a production server with more horsepower later by copying files and databases, so you don’t lose your effort.

Let’s install stuff and set a password on your database. Login via ssh and then (I use root, you can use sudo if you want):

apt update && apt upgrade
apt install php apache2 libapache2-mod-php php-{gd,common,mail,mail-mime,mysql,pear,mbstring,xml,curl} freeradius freeradius-mysql freeradius-utils mariadb-server
mysql_secure_installation

Now we create a radius database and populate it:

mysql -u root -p
CREATE DATABASE radius;
GRANT ALL ON radius.* TO radius@localhost IDENTIFIED BY "somecomplexpassword";
FLUSH PRIVILEGES;
\q

verify you can connect and then populate the database:

mysql -u radius -p
Enter password: 
Welcome to the MariaDB monitor.  Commands end with ; or \g.

MariaDB [(none)]> SHOW DATABASES;
+--------------------+
| Database           |
+--------------------+
| information_schema |
| radius             |
+--------------------+
2 rows in set (0.001 sec)

MariaDB [(none)]> QUIT
Bye
mysql -u root -p radius < /etc/freeradius/*/mods-config/sql/main/mysql/schema.sql

Now we link mariadb to freeradius and change the password in the freeradius config file:

vim /etc/freeradius/3.0/mods-available/sql
  sql {
        
        dialect = "mysql"
        driver = "rlm_sql_mysql"
...
          # Connection info:
        #
        server = "localhost"
        port = 3306
        login = "radius"
        password = "whateveryouused"
        radius_db = "radius"
chgrp -h freerad /etc/freeradius/*/mods-available/sql
systemctl enable --now freeradius.service
systemctl restart freeradius
systemctl status freeradius
● freeradius.service - FreeRADIUS multi-protocol policy server
     Loaded: loaded (/lib/systemd/system/freeradius.service; enabled; vendor preset: enabled)
     Active: active (running) since Mon 2022-04-18 10:59:37 PDT; 1min 6s ago
...

If you get something like that last message it means freeradius is running okay. If you see errors you can troubleshoot with:

journalctl -xe

I’ll do another post on setting up Daloradius next, but you have to get freeradius working first.

3 Likes

Daloradius is a web-based control panel for freeradius. You can set up new users, new services and define bandwidth packages. You can do other stuff, but here we’ll focus on these three functions.

In this post I’ll highlight what you have to do to install it, then configuration might be another post.

Install Daloradius by logging in via ssh to your freeradius server and doing:

cd /usr/src
wget https://github.com/lirantal/daloradius/archive/master.zip
unzip master.zip 
mv daloradius-master/ daloradius
cd daloradius/
mysql -u root -p radius < contrib/db/fr2-mysql-daloradius-and-freeradius.sql 
mysql -u root -p radius < contrib/db/mysql-daloradius.sql
mv daloradius /var/www/html/
mv /var/www/html/daloradius/library/daloradius.conf.php.sample /var/www/html/daloradius/library/daloradius.conf.php
chown -R www-data:www-data /var/www/html/daloradius/
chmod 664 /var/www/html/daloradius/library/daloradius.conf.php
vim /var/www/html/daloradius/library/daloradius.conf.php
  $configValues['CONFIG_DB_ENGINE'] = 'mysqli';
  $configValues['CONFIG_DB_HOST'] = 'localhost';
  $configValues['CONFIG_DB_PORT'] = '3306';
  $configValues['CONFIG_DB_USER'] = 'radius';
  $configValues['CONFIG_DB_PASS'] = 'yoursupersecurepassword';
  $configValues['CONFIG_DB_NAME'] = 'radius';
pear install DB
pear install MDB2
systemctl restart freeradius.service apache2

Now you should have a website you can visit at http://10.30.10.5/daloradius and login with username: administrator, password: radius

3 Likes

Before you go further, you need to make sure your freeradius server can see your tower Mikrotik. This means your routing, including OSPF, is working. To verify this is happening, with everything so far plugged in (Juniper, Mikrotik and freeradius server).

To help with troubleshooting in general I have created a fourth test network you can plug your laptop into and reach any of those components, as long as you plug it into ge-0/0/3 on your Juniper, which should give it a DHCP lease.

From your laptop, ping 10.30.10.5 (freeradius server) and 192.168.30.2 (your Mikrotik tower router). If you can, it means your OSPF area 1 is working and sees the routes on the Mikrotik. If it doesn’t, trying to troubleshoot freeradius connection issues will be painful/impossible.

Once you have this working, we can set up the daloradius and end user client router. The easiest way is to test this all on the bench before putting it on a tower somewhere. Issues are far easier to find this way.

We’ll also set up the ePMP AP/client with a management VLAN so your core management (in this case testing using the freeradius server) can reach and manage those devices, and you can reach them from your test laptop too to configure them. This also means you’ll be able to manage your ePMP radios from Cambium’s management software if you choose.

3 Likes

So now login to your Daloradius server and check server status. You should see something like this:

That tells you that Daloradius is running at least. Now you have to create a NAS, that’s the server instance that your Mikrotik is supposed to authenticate through. You can get to that section under Management > NAS > New NAS and create something like:

Now you have to create a speed package, which you do in Management > Profiles > New Profile. Here’s what I’m using to create a profile of 25/5Mbps hooking into the Mikrotik Rate-Limit Attribute:

Now you have to create an IP pool for them to hook up to, in this case I’m using CGNAT, which means they’ll think they have a public static IP, but really they have a private IP block (you can look up what that all means if you want) in the 100.64.x.x space. I’ll put these customers on a 100.64.30.0/24 subnet, assuming I don’t need more than 255 customers per tower instance. Your configuration will differ here based on your needs. So go to Management > IP Pool > New Pool and give it a name and address:

Now you have to create a user, which is the actual home ISP customer router. Here’s where it got weird for me. By the time you try this, hopefully Daloradius will have fixed it, but I had to create the user directly in the database from command line. You should try it on your GUI first and see if it works. I’ll post the mysql commands in case it doesn’t. If you go to Management > Users > New User you can enter the details. Here I created the highly suspect user ‘2’ with some simple password, change to whatever you’re actually using:

In case creating the user that way doesn’t work (still) when you try it, here’s the mysql commands you would use to create them manually. Just login via ssh and do:

mysql -u radius -p
use database radius;
INSERT INTO radcheck ( id , UserName , Attribute , op , Value ) VALUES ( NULL , '2', 'Cleartext-Password', ':=', 'userpassword');
INSERT INTO radreply (username, attribute, op, value) VALUES ('2', 'Mikrotik-Rate-Limit', '==', '25M/5M');
INSERT INTO radcheck ( id , UserName , Attribute , op , Value ) VALUES (NULL , '2', 'Expiration', ':=', '13 Jan 2029 11:00');
INSERT INTO radcheck (username,attribute,op,value) VALUES ('2', 'Simultaneous-Use', ':=', '1');
quit

If that worked, you should now see the user appear in the list on Daloradius.

Next we can try to connect a customer router directly to the Mikrotik ether3 port and see if it authenticates using the credentials you just created. After that works, we can configure the ePMP link, make sure we can see it across the network on a VLAN, then attach the customer router to the ePMP client and see if it still authenticates. That will be in the next post though, this one is getting long.

4 Likes

Okay, now we hook up a customer router directly to the Mikrotik on ether3 to see if the PPPoE works.

I grabbed a cheap router off my bench and hooked it up. You’re much better off using the Cambium ones, I just happened to have this sitting around during the test. Either way, you’ll get the idea of the settings you’ll need on the WAN side. Here’s how my WAN settings are configured to use the settings we just set up in Daloradius:

Notice you have to put the username and password in. It takes a few minutes for it to find the path back to your freeradius server and authenticate, then push out the bandwidth profile, but eventually it should say it’s connected.

You should now be able to run a speed test and get whatever bandwidth you specified in your Daloradius profile. If you don’t get that, figure out what’s wrong before you hook up the ePMP link.

If it’s working, now you can configure your AP. In our case, you have to specify the management IP and VLAN. Those subnets and VLAN configurations should already be set up in the Mikrotik, so it should “just work” when you plug in the AP to ether3 after you get it configured. Here’s how it looks on the ePMP AP:

Now if you hook it up to the Mikrotik, you should be able to ping it from your test laptop, and login and manage the other settings you need to deploy it on your tower.

Assuming all this worked, you should be able to create a link by also putting your client radio on the same VLAN and giving it an IP in the same management subnet. After that, you should be able to just plug in your client router that you just configured and see if it connects!

Let me know if any of this has been helpful. Hopefully it will get you headed in the right direction and make your life slightly easier. If you have suggestions for edits you can message me and I’ll try to correct them.

3 Likes

Nice writeup. Basically same for any BNG.

Very good write up Silver, hope I didnt confuse you too much while you were learning :rofl:.

Just a couple points to clarify:
A NAS is the point of authentication and is usually an edge router (tower router) but could be a central router in a LNS/LAC setup.

Daloradius is just a web frontend to the database that freeradius uses, its a good way to populate a database structure and have freeradius understand how to use the database. If you are having troubkes adding users or NAS points, watch for the small error listing that tells you why it failed.m, nine times of ten its finger troubles. The Users page is very confusing as it has many apply buttons but only the box you are populating is the correct apply button. Those fields are literally being used in a php_mysqli() statement and the apply button is for that set of variables only.

when creating packages and plans, use the += operator except for the last to be sent or only the last will be applied. One exception is for passwords where == means must be equal to.
If you do not use the correct operators then the flow through method that VSAs are passed and processed will not work as intended.

Remember that an AVpair is the same as a VSA so you are ti use the terms interchangeably.

This topic was automatically closed 365 days after the last reply. New replies are no longer allowed.