Summary: This article describes how to Mesh two XV/XE series AP’s together in cnMaestro. For the purposes of this article, ensure both AP’s are running CaOS 6.4.1-r5 or greater and are plugged directly into the Switch. For further reading, please review the Enterprise Wi-Fi AP Mesh deployment guidelines.
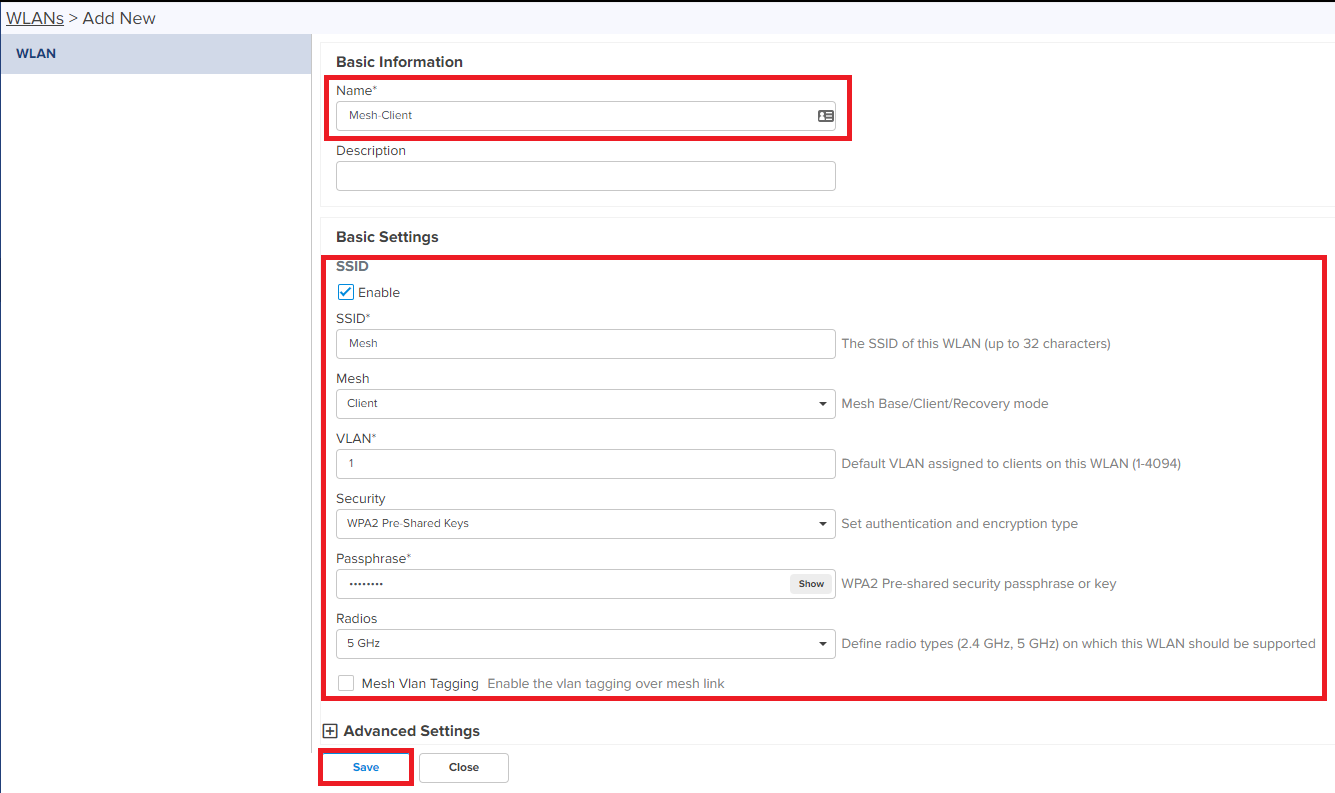
Name of WLAN (not SSID) - I have used Mesh-Client to distinguish the WLAN from the Mesh-Base we have already created
SSID - Enabled
SSID - Mesh - This needs to be the same for both the Mesh-Base and Mesh-Client WLANs
Mesh - Select Client for this WLAN
VLAN - 1
Set the SSID Security method, in this case I have used WPA2 PSK. This needs to be exactly the same (including password) as the Mesh Base WLAN we previously created.
Select 2.4GHz or 5GHz to be used for this Mesh. Both SSIDs will need the same band to be chosen.
To stop a Network loop from occurring once the Mesh has been formed (as both APs are currently plugged in to the Switch), once the MeshClient configuration has successfully applied, unplug the Client AP.
Repeat steps 14-17 for the Base AP, applying the MeshBase AP Group instead of the MeshClient AP Group.
Confirm the configuration has successfully applied to the Base AP. Plug the Client AP into the PoE adapter (with no network cable) and after the Client AP has successfully booted, a Mesh should form.
I am begging you for one thing, do not write in this case that it is ZERO TOUCH MESH. Because just like in the e410, e 600 and other models, you have to really know what you are doing. Anyway, on the latest firmware 6.4.1 e410 does not run mesh despite the correct configuration
There is no mention of Zero Touch Mesh in this article . In regards to the e410 6.4.1 issue, please log a support case and we can investigate this further.
I have had enough of every new software release to write to you what is wrong. It is you who should test your solutions. You don’t have any test scenarios. Everything is released into the element. Maybe it will work … Since on 4.2.2.1 with the above MESH configuration on the e410 working, and after uploading 6.4.1 it does not work, it is obvious that it is not my fault and my configuration. I would like to add that after the recently reported bug, allowing you to test on my environments, no one would even write back that the problem was solved. Well, here’s how Cambium works.
I’m doing the test using a Mesh Network configuration, then if I’m not wrong the Base Mesh is spreading the SSID to connect to the Client Mesh and also to connect the wireless customers, however the Client Mesh is not spreading a SSID for Wireless customers, is that correct? We can do WDS using the Client Mesh but it will not be able to connect wireless customers as the Base can do?
Radio models I’m testing: Cambium Indoor E425H and External XV2-T0.
Sorry, I just realized that I need to create a second SSID for customers, now I did and yes I can connect wireless clients in the BASE and in the CLIENT MESH.
Thanks for making this, I have few novice question.
cnMaestro 5.1.0 is different, would you have an updated version?
I have 3 outdoor and 6 indoor Wi-Fi AP (XV2-) they are connected via ePMP-3000 to Force 300-16, is there any additional steps for this setup ?